
itsstopher
PM 2018
PM 2017
PM 2016
PM 2015
PM 2014
PM 2013
PM 2012
SM 2011
SM 2010
SM 2009
SM 2008
SM 2007
SM 2006
SM 2005
SM 2004
SM 2003
Full Member
Transfer Case Assembly Replacement
Removal Procedure

1. Raise the vehicle.
2. Remove the transfer case shields.
3. Remove the front propeller shaft.
4. Remove the rear propeller shaft.
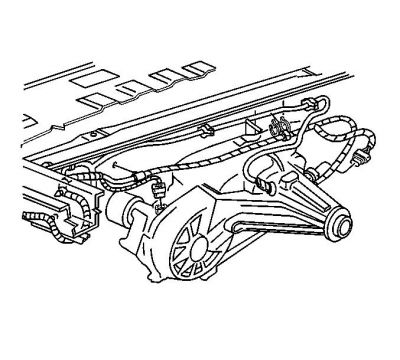
5. Disconnect the motor/encoder electrical connector.
6. Remove the transfer case vent hose.
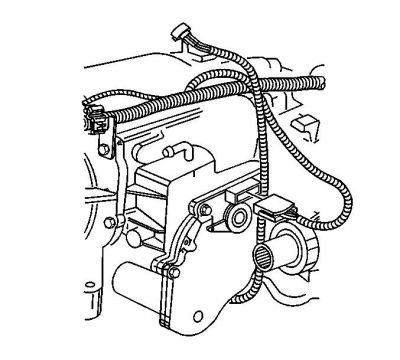
7. Remove the electrical wiring harness from the transfer case.
8. Support the transfer case with a suitable transmission jack.
Important
When removing the transfer case from the transmission, do not remove the transmission mount or the transfer case adapter.
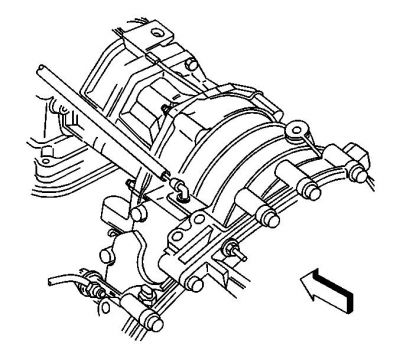
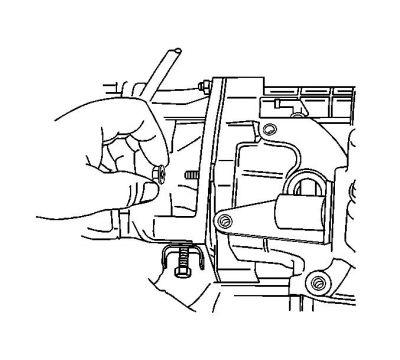
9. Remove the transfer case retaining nuts from the transfer case studs.

10. Separate the transfer case from the transmission by moving the transfer case straight back toward the rear of the vehicle.
11. Rotate the transfer case so that the transfer case is perpendicular to the transmission assembly.
12. Lower the transfer case.
Installation Procedure
1. Rotate the transfer case so that the transfer case is perpendicular to the transmission assembly.
2. Raise the transfer case into position.
3. Rotate the transfer case so that the transfer case aligns with the transfer case adapter.
4. Install the transfer case assembly.
5. Install the transfer case retaining nuts. Tighten the transfer case retaining nuts to 50 N?m (37 lb ft).
6. Install the transfer case vent hose.
7. Install the electrical wiring harness to the transfer case.
8. Connect the motor/encoder electrical connector.
9. Install the front propeller shaft.
10. Install the rear propeller shaft.
11. Inspect the transfer case fluid level.
12. Install the transfer case shield.
13. Lower the vehicle.
Removal Procedure
1. Raise the vehicle.
2. Remove the transfer case shields.
3. Remove the front propeller shaft.
4. Remove the rear propeller shaft.
5. Disconnect the motor/encoder electrical connector.
6. Remove the transfer case vent hose.
7. Remove the electrical wiring harness from the transfer case.
8. Support the transfer case with a suitable transmission jack.
Important
When removing the transfer case from the transmission, do not remove the transmission mount or the transfer case adapter.
9. Remove the transfer case retaining nuts from the transfer case studs.
10. Separate the transfer case from the transmission by moving the transfer case straight back toward the rear of the vehicle.
11. Rotate the transfer case so that the transfer case is perpendicular to the transmission assembly.
12. Lower the transfer case.
Installation Procedure
1. Rotate the transfer case so that the transfer case is perpendicular to the transmission assembly.
2. Raise the transfer case into position.
3. Rotate the transfer case so that the transfer case aligns with the transfer case adapter.
4. Install the transfer case assembly.
5. Install the transfer case retaining nuts. Tighten the transfer case retaining nuts to 50 N?m (37 lb ft).
6. Install the transfer case vent hose.
7. Install the electrical wiring harness to the transfer case.
8. Connect the motor/encoder electrical connector.
9. Install the front propeller shaft.
10. Install the rear propeller shaft.
11. Inspect the transfer case fluid level.
12. Install the transfer case shield.
13. Lower the vehicle.