There doesn't seem to be much info present on this forum about something like this, I'm more hardcore than most I guess so I decided to post up. Plans for the 2009 LT2 Z71 are as follows...
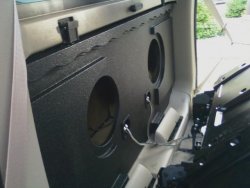
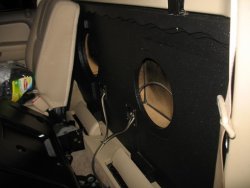
-Full sound deadening with Raammat BXT II and ensolite, (complete)
-JVC KW AVX 840 with Ipod interface, Bass EQ, and reverse cam (complete except reverse cam)
-Factory integration with PAC Audio (OS4 etc. etc.) (complete)
-Kicker Big 3 upgrade with 0 AWG fused cable (completed)
-Rockford Fosgate dual amplifier install kit, 4 AWG power and grounds (complete)
-Custom amp rack (completed and changed again)
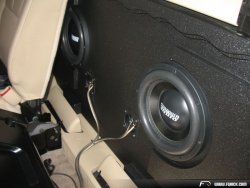
-2 Sundown SD-2 4ohm DVC 10's, (complete)
-4x RF Punch 5.25" door speakers powered by HU (complete)
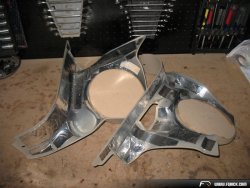
-Image Dynamics components (125w RMS @ 4 ohms) mounted in Q logic kick panels
-RF Power 400.2 powering each component set 125w x 2 RMS @ 4 ohms (complete)
-RF Power T10001bd 1000w mono powering each sub at 410 RMS x 2 @ 4 ohm (installed)
-1000w total RMS
I've never really had a vehicle that I really cared to throw a good high quality sounding system in until getting this truck. Didn't care for the weight it would add in other vehicles and thought this stuff was harder than in truth. I contemplated it in my Trans Am but that vehicle has become a drag car, and I didn't want to compromise space in other vehicles, but the Lanche has a stout alternator and I'm not going too much for performance with a 6k lb. truck, so I figured this was a good candidate. The goal is a truly quiet luxury ride with a stereo that will rape your ears with volume, quality, look stealth, compromise little space, and be easily removed if ever needed. I've seen alot of slap ass stereo installs and decided mine was not going to be one of them. I'm also not willing to hand my wallet over to the kids at car toys or best buy either.
I worked on this from sun up to sundown over a day. I don't like to do things twice so I did all of this at once. If running wire, why not deaden also?
Some notes on the install
-I ordered roughly 37 sq. ft. of BXT II and 42 sq. ft.ensolite. I was happy with the results and coverage of the tiles for the floorpan and midgate with this amount, however more ensolite would be needed to finish the floorpan if you do the midgate as well. Ensolite really requires 100% coverage while BXT does not. I will have to remove the rear seats again once I get more ensolite and finish the floor. I had some BXT II left over even after heavy coverage in the rear and deadening the back of interior trim panels as I reinstalled them, specifically the B pillar trim panels and rear seat trim, which I did not photograph. I anticipate using the same amount to do all four doors and finish what I started. I believe I used roughly 25 lbs. of deadening material.
-Measuring, slicing, peeling, sticking, and rolling is the name of the game here. My back killed! A roller is helpful and cuts down on the lacerations from trying to work it with your hand. Ensolite is very sticky. I would not have wanted to spray glue, peel and stick is the way to go.
I was very impressed with the stickiness and workability of the raamaudio stuff. Totally happy!
-The rear seats are very heavy and awkward. I'm a pretty big strong guy and I could not remove the big rear seat. I unbolted the midgate and slid the bench seat in the bed after lifting it out. Everything on the truck has big bolts and is freakin' heavy.
-Trim panel removal tools help alot. Although the avalanche snaps together like a plastic model very nicely, they do help.
-The midgate window knobs are attached with window lever clips. I had to replace them after removing them when reassembling the midgate which now fits very tight and reminds me of a thick wooden door when I pound on it now.
-There are lots of BCM's and SRS sensor type boxes along with a harness under the seats and center console. You can unbolt them and put them to the side. Be careful working around these. You can remove the carpet, but the juke can be worked around if you work on front and back separately.
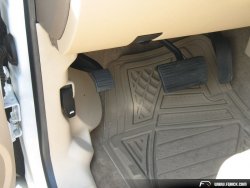
-There is a fair amount of sound deadening from the factory, not need to cover it with tiles. I left the factory dash deadening and footwell padding in place.
-17ft. RCA's were used here along with 30ft. of speaker wire. I was able to do 2 runs from the amp rack to the glove box. I will be installing the crossovers in the glove box. All wires can be ran along factory harness pretty easily to prevent pinching.
-Good time to clean carpet and detail all trim panels here which I did. Truck is clean as a whistle inside now!
-Power wire was run along factory wire from mega fuse block to fuse box and ran through big factory grommet and under drivers carpet area. Keep power wires away from RCA's here.
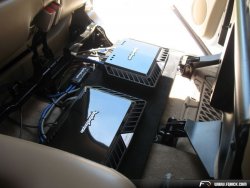
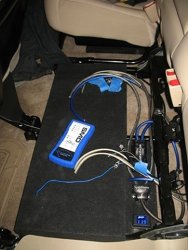
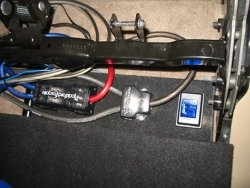
-The amp rack came out to 26"x12" on the surface. 3/4" MDF was used. One side was lifted 1.5" inches to get it level with the driveshaft hump. Carpet was from O'Reilly's and matches decent. Just enough room for the amps I've picked out.
-I did have to ream out one of the holes in the bottom of the console tray to run the ribbon for the bass EQ, the Ipod connect an run between the center console and dash without having to hack it up.
You can view all the pics I took by clicking on the link to my fquick gallery and viewing the folder titled "stereo install"
http://www.fquick.com/garages/viewgallery.php?carid=40267
I'll be updating this thread as future progress happens. Hopefully very soon.
-Full sound deadening with Raammat BXT II and ensolite, (complete)
-JVC KW AVX 840 with Ipod interface, Bass EQ, and reverse cam (complete except reverse cam)
-Factory integration with PAC Audio (OS4 etc. etc.) (complete)
-Kicker Big 3 upgrade with 0 AWG fused cable (completed)
-Rockford Fosgate dual amplifier install kit, 4 AWG power and grounds (complete)
-Custom amp rack (completed and changed again)
-2 Sundown SD-2 4ohm DVC 10's, (complete)
-4x RF Punch 5.25" door speakers powered by HU (complete)
-Image Dynamics components (125w RMS @ 4 ohms) mounted in Q logic kick panels
-RF Power 400.2 powering each component set 125w x 2 RMS @ 4 ohms (complete)
-RF Power T10001bd 1000w mono powering each sub at 410 RMS x 2 @ 4 ohm (installed)
-1000w total RMS
I've never really had a vehicle that I really cared to throw a good high quality sounding system in until getting this truck. Didn't care for the weight it would add in other vehicles and thought this stuff was harder than in truth. I contemplated it in my Trans Am but that vehicle has become a drag car, and I didn't want to compromise space in other vehicles, but the Lanche has a stout alternator and I'm not going too much for performance with a 6k lb. truck, so I figured this was a good candidate. The goal is a truly quiet luxury ride with a stereo that will rape your ears with volume, quality, look stealth, compromise little space, and be easily removed if ever needed. I've seen alot of slap ass stereo installs and decided mine was not going to be one of them. I'm also not willing to hand my wallet over to the kids at car toys or best buy either.
I worked on this from sun up to sundown over a day. I don't like to do things twice so I did all of this at once. If running wire, why not deaden also?
Some notes on the install
-I ordered roughly 37 sq. ft. of BXT II and 42 sq. ft.ensolite. I was happy with the results and coverage of the tiles for the floorpan and midgate with this amount, however more ensolite would be needed to finish the floorpan if you do the midgate as well. Ensolite really requires 100% coverage while BXT does not. I will have to remove the rear seats again once I get more ensolite and finish the floor. I had some BXT II left over even after heavy coverage in the rear and deadening the back of interior trim panels as I reinstalled them, specifically the B pillar trim panels and rear seat trim, which I did not photograph. I anticipate using the same amount to do all four doors and finish what I started. I believe I used roughly 25 lbs. of deadening material.
-Measuring, slicing, peeling, sticking, and rolling is the name of the game here. My back killed! A roller is helpful and cuts down on the lacerations from trying to work it with your hand. Ensolite is very sticky. I would not have wanted to spray glue, peel and stick is the way to go.
I was very impressed with the stickiness and workability of the raamaudio stuff. Totally happy!
-The rear seats are very heavy and awkward. I'm a pretty big strong guy and I could not remove the big rear seat. I unbolted the midgate and slid the bench seat in the bed after lifting it out. Everything on the truck has big bolts and is freakin' heavy.
-Trim panel removal tools help alot. Although the avalanche snaps together like a plastic model very nicely, they do help.
-The midgate window knobs are attached with window lever clips. I had to replace them after removing them when reassembling the midgate which now fits very tight and reminds me of a thick wooden door when I pound on it now.
-There are lots of BCM's and SRS sensor type boxes along with a harness under the seats and center console. You can unbolt them and put them to the side. Be careful working around these. You can remove the carpet, but the juke can be worked around if you work on front and back separately.
-There is a fair amount of sound deadening from the factory, not need to cover it with tiles. I left the factory dash deadening and footwell padding in place.
-17ft. RCA's were used here along with 30ft. of speaker wire. I was able to do 2 runs from the amp rack to the glove box. I will be installing the crossovers in the glove box. All wires can be ran along factory harness pretty easily to prevent pinching.
-Good time to clean carpet and detail all trim panels here which I did. Truck is clean as a whistle inside now!
-Power wire was run along factory wire from mega fuse block to fuse box and ran through big factory grommet and under drivers carpet area. Keep power wires away from RCA's here.
-The amp rack came out to 26"x12" on the surface. 3/4" MDF was used. One side was lifted 1.5" inches to get it level with the driveshaft hump. Carpet was from O'Reilly's and matches decent. Just enough room for the amps I've picked out.
-I did have to ream out one of the holes in the bottom of the console tray to run the ribbon for the bass EQ, the Ipod connect an run between the center console and dash without having to hack it up.
You can view all the pics I took by clicking on the link to my fquick gallery and viewing the folder titled "stereo install"
http://www.fquick.com/garages/viewgallery.php?carid=40267
I'll be updating this thread as future progress happens. Hopefully very soon.
")