The admins can decide if this should be a sticky or not.
This thread is about how to upgrade/swap out your rotors and pads. It is written for people who can make the easiest job nearly impossible - like myself. It is applicable for the 2007 to 2013 Avalanche, Tahoe, Suburban or Yukon. (likely EXT also, but I'm not entirely sure). It reflects the GMT-900 platform.
For my swap, I chose to go with the best I could fit in the stock calipers (and under 17" rim... although more on that later).
I selected EBC dimpled and slotted rotors and EBC Yellowstuff (racing) pads. The yellowstuff are the most aggressive pad I could get. I'm doing this for towing, so I thought aggressive would make sense. They do dust more than the greenstuff, but that's okay with me. My truck isn't a show pony.
EBC Brakes GD7372 GD3 Front Rotor (GD7373 Rear Rotor not shown)

EBC Brakes DP41830R Yellostuff Front Pads (DP41780R Rear Pads not shown)

I ordered this all from Amazon for around $700.
 Tip: Be careful ordering from Amazon. Each box comes with 4 pads, not 2. So you only need one box of fronts and one box of rears. Or be like me and get spares by accident!
Rear Brakes
Step 1:
Jack up your vehicle. I chose to just to the rear end first, then the front end second. I was also doing a shock swap at the same time (look for that write-up elsewhere). Place jack stands in safe locations such that the truck is suspended. I chose to place mine under the rear axle. Also block the front wheel.

Step 2:
Remove your wheels. Set them aside.
Step 3:
I tend to remove the brakes in two steps. Others may do it in one. First, remove the entire caliper from the hub assembly. This is done using two 18mm bolts on the back of the assembly. You may need some good leverage to remove these, or get a powerful impact gun. Once the caliper is removed, place it on top of something so the line isn't holding the weight. At this point the old pads may flop around or fall out. I suggest you try to keep them in place.

Step 4: Pull off the old rotor. This is no small feat. If you live in a wet or snowy area, these are likely held on with some rust. I use a sledge hammer. However if you wiggle it slowly, it eventually will come. This step is meant to be hard, so don't worry. Just ensure your truck isn't going to fall off its jack stands.

Step 5:
Compare your old and new rotors to make sure they are identical. Mine were. Look them up and down, inside and out. The only difference should be the thickness of the braking surface. Obviously the old one will be worn down a bit.

Step 6:
Clean off the surface of the hub with a metal brush. Get off any bumps. Place the new rotor on the rear hub. Wiggle it down till it is nice and flush. Bolt on the caliper again, right where you took it off. I suggest using some locktight on the bolts. Blue locktight is best. Red is harder to remove when you screw this step up. I recommend leave in the old pads at this point as otherwise the empty caliper may scuff up your nice new shiny rotors (this is what happened to me). If the caliper doesn't fit, then take them out. We'll deal with that later.
Step 7:
To insert the new pads, you need to flip open the caliper. This is done via two other bolts. These bolts are part of the assembly that slides in and out to centre your caliper. You only need to take out one. For the rear calipers, take out the bottom bolt. This seems confusing, but if you don't the brake line will prevent you from gaining access. As you can see, I did the top bolt and thus did this twice. To remove the bolt, you need a two wrenches, as there otherwise it just spins inside.

Step 8:
If you've done the step correctly, the caliper can now swing open from the bottom. You can pull out the old pads now.

Step 9:
Before installing your new pads, you may need to sand down the paint a bit. EBC Brakes are notorious for fitting too snug in the channels if you don't. I started with some emery cloth, and ended up using the side of a soft cutting wheel on my bench grinder. Either way, get the paint off.

Step 10:
Apply grease to the top and bottom tabs of each pad. I believe this is copper grease. It comes with the EBC pads and will prevent squeaking later in life.

Step 11:
Now slide each pad into the retainer, while still holding up the caliper. They will fit into little grooves on the top and bottom that are skimmed in copper clips. The one with the wear indicator goes on the inside. These only fit one way, so don't force it too much. If you try to put the pad with the wear indicator on the outside, it won't let you. (it just makes you think you can and I mess with it for 5 minutes)

Step 12:
In order to make your new pads and rotor fit, you now have to squeeze the caliper wide open. I used a simple clamp. Make sure you centre the clamp on the piston to keep it from getting crooked. This could wreck your piston.

Step 13:
With the caliper now WIDE open, you can pivot the caliper back up and over the pads. This may take some work. You may also need to push in the bolt on the back (bottom) to get the clearance you need. Just take your time and it will fit. Tighten the bolt using your dual wrench approach again.
Step 14:
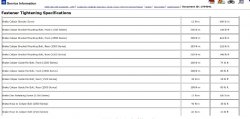
Double check the torque specs on each bolt. The guide pins want 74 ft-lbs, while the bracket bolts want 148 ft-lbs. Do this now, lest you forget later.
Here is a look at the final assembly

And here is a comparison of old versus new pads:

Step 15:
Bolt up your wheel. You may prefer to leave it off until you do the other side. Up to you.
Step 16:
Repeat on other side of vehicle.
Front Brakes:
Step 17:
As with the rears, I chose to jack up both sides and place jack stands under the frame rails on either side. The front wheels will hang down, so you need to jack it up a bit higher.
Step 18:
Remove the caliper with bracket. As before, you've got two 18mm bolts on the back side. Here is a pic with them removed, to get an idea where they are. As before, these take serious grunt.
Tip: Turn the wheels for easy access, then use your impact gun. This makes short work of it.

Step 19:
Compare the old and new rotors once again to ensure they are identical. Here is a picture of my GD7373.
Tip: Note that slotted rotors are directional. This box is labelled Right. This is one thing I actually managed not to goof up.

Step 18:
Bolt the caliper back on. Leave in the old pads to insulate. They should fit. If not, pop them out and on to the ground. re-fasten the two bolts with locktight. Hand tighten for now.

Step 19:
Now we need to pivot down the caliper again. This time we CAN use the top bolt as the brake lines give enough room. For some reason I only needed one wrench for the fronts. Not sure why.

Step 20:
As before, file down the tabs on the pads again. This will make them fit better. If you aren't using EBC, you may not need to do this. Just see how tight they are with a test fit. Goop with the grease and slide the pads into position. This time there are wear strips on both pads. Not sure why. Maybe this is an EBC thing. So you can't screw this up.
Step 21:
Once the pads are installed, you need to spread open the caliper again. This time there are two pistons, so stick a wrench across them. Tighten until they are all the way open.

Step 22:
Close the caliper! These ones seemed to close a bit easier than the rears. Re-attach the pivot bolt to the slide pin. Again, use some locktight. Torque to 74 ft-lbs on the slide pin, and 148 ft-lbs on the bracket.

Step 23: Re-attach your wheel and then do the other side.
Step 24: Take your truck for a drive and check it out. With EBC you have a "bed in period" of about 1000 miles. It means brake like a grandma... no sudden stops. You can also hasten this by doing a "Pro cut lathe" job. I have one booked for my truck.
All done!! Unless you are me....
-----
I came across a horrible problem when I did my brakes. On my test drive I noticed a horrible screeching and howling from the rear. I'll cut to the chase on this one and not give you the two day run down it took to solve this.
The rims, which were aftermarket 17" (for winter) were now rubbing on the caliper (the banjo bolt to be exact). I guess the tolerance is so tight that the new brake pad width pushed them together. I ended up carving a groove into each rear wheel:

To fix I installed wheel spacers of 1/4". It goes to show you that swapping to aftermarket wheels must be done with great care.

My inspiration to install these brakes, and my review of them, can be found here:
http://chevyavalanchefanclub.com/cafcna/index.php/topic,110817.0.html
This thread is only meant to describe the install process, so please keep questions related to that.
This thread is about how to upgrade/swap out your rotors and pads. It is written for people who can make the easiest job nearly impossible - like myself. It is applicable for the 2007 to 2013 Avalanche, Tahoe, Suburban or Yukon. (likely EXT also, but I'm not entirely sure). It reflects the GMT-900 platform.
For my swap, I chose to go with the best I could fit in the stock calipers (and under 17" rim... although more on that later).
I selected EBC dimpled and slotted rotors and EBC Yellowstuff (racing) pads. The yellowstuff are the most aggressive pad I could get. I'm doing this for towing, so I thought aggressive would make sense. They do dust more than the greenstuff, but that's okay with me. My truck isn't a show pony.
EBC Brakes GD7372 GD3 Front Rotor (GD7373 Rear Rotor not shown)

EBC Brakes DP41830R Yellostuff Front Pads (DP41780R Rear Pads not shown)

I ordered this all from Amazon for around $700.
Tip: Be careful ordering from Amazon. Each box comes with 4 pads, not 2. So you only need one box of fronts and one box of rears. Or be like me and get spares by accident!Rear Brakes
Step 1:
Jack up your vehicle. I chose to just to the rear end first, then the front end second. I was also doing a shock swap at the same time (look for that write-up elsewhere). Place jack stands in safe locations such that the truck is suspended. I chose to place mine under the rear axle. Also block the front wheel.

Step 2:
Remove your wheels. Set them aside.
Step 3:
I tend to remove the brakes in two steps. Others may do it in one. First, remove the entire caliper from the hub assembly. This is done using two 18mm bolts on the back of the assembly. You may need some good leverage to remove these, or get a powerful impact gun. Once the caliper is removed, place it on top of something so the line isn't holding the weight. At this point the old pads may flop around or fall out. I suggest you try to keep them in place.

Step 4: Pull off the old rotor. This is no small feat. If you live in a wet or snowy area, these are likely held on with some rust. I use a sledge hammer. However if you wiggle it slowly, it eventually will come. This step is meant to be hard, so don't worry. Just ensure your truck isn't going to fall off its jack stands.

Step 5:
Compare your old and new rotors to make sure they are identical. Mine were. Look them up and down, inside and out. The only difference should be the thickness of the braking surface. Obviously the old one will be worn down a bit.

Step 6:
Clean off the surface of the hub with a metal brush. Get off any bumps. Place the new rotor on the rear hub. Wiggle it down till it is nice and flush. Bolt on the caliper again, right where you took it off. I suggest using some locktight on the bolts. Blue locktight is best. Red is harder to remove when you screw this step up. I recommend leave in the old pads at this point as otherwise the empty caliper may scuff up your nice new shiny rotors (this is what happened to me). If the caliper doesn't fit, then take them out. We'll deal with that later.
Step 7:
To insert the new pads, you need to flip open the caliper. This is done via two other bolts. These bolts are part of the assembly that slides in and out to centre your caliper. You only need to take out one. For the rear calipers, take out the
bottom bolt. This seems confusing, but if you don't the brake line will prevent you from gaining access. As you can see, I did the top bolt and thus did this twice. To remove the bolt, you need a two wrenches, as there otherwise it just spins inside.
Step 8:
If you've done the step correctly, the caliper can now swing open from the bottom. You can pull out the old pads now.

Step 9:
Before installing your new pads, you may need to sand down the paint a bit. EBC Brakes are notorious for fitting too snug in the channels if you don't. I started with some emery cloth, and ended up using the side of a soft cutting wheel on my bench grinder. Either way, get the paint off.

Step 10:
Apply grease to the top and bottom tabs of each pad. I believe this is copper grease. It comes with the EBC pads and will prevent squeaking later in life.

Step 11:
Now slide each pad into the retainer, while still holding up the caliper. They will fit into little grooves on the top and bottom that are skimmed in copper clips. The one with the wear indicator goes on the inside. These only fit one way, so don't force it too much. If you try to put the pad with the wear indicator on the outside, it won't let you. (it just makes you think you can and I mess with it for 5 minutes)

Step 12:
In order to make your new pads and rotor fit, you now have to squeeze the caliper wide open. I used a simple clamp. Make sure you centre the clamp on the piston to keep it from getting crooked. This could wreck your piston.

Step 13:
With the caliper now WIDE open, you can pivot the caliper back up and over the pads. This may take some work. You may also need to push in the bolt on the back (bottom) to get the clearance you need. Just take your time and it will fit. Tighten the bolt using your dual wrench approach again.
Step 14:
Double check the torque specs on each bolt. The guide pins want 74 ft-lbs, while the bracket bolts want 148 ft-lbs. Do this now, lest you forget later.
Here is a look at the final assembly

And here is a comparison of old versus new pads:

Step 15:
Bolt up your wheel. You may prefer to leave it off until you do the other side. Up to you.
Step 16:
Repeat on other side of vehicle.
Front Brakes:
Step 17:
As with the rears, I chose to jack up both sides and place jack stands under the frame rails on either side. The front wheels will hang down, so you need to jack it up a bit higher.
Step 18:
Remove the caliper with bracket. As before, you've got two 18mm bolts on the back side. Here is a pic with them removed, to get an idea where they are. As before, these take serious grunt.
Tip: Turn the wheels for easy access, then use your impact gun. This makes short work of it.
Step 19:
Compare the old and new rotors once again to ensure they are identical. Here is a picture of my GD7373.
Tip: Note that slotted rotors are directional. This box is labelled Right. This is one thing I actually managed not to goof up.
Step 18:
Bolt the caliper back on. Leave in the old pads to insulate. They should fit. If not, pop them out and on to the ground. re-fasten the two bolts with locktight. Hand tighten for now.

Step 19:
Now we need to pivot down the caliper again. This time we CAN use the top bolt as the brake lines give enough room. For some reason I only needed one wrench for the fronts. Not sure why.

Step 20:
As before, file down the tabs on the pads again. This will make them fit better. If you aren't using EBC, you may not need to do this. Just see how tight they are with a test fit. Goop with the grease and slide the pads into position. This time there are wear strips on both pads. Not sure why. Maybe this is an EBC thing. So you can't screw this up.
Step 21:
Once the pads are installed, you need to spread open the caliper again. This time there are two pistons, so stick a wrench across them. Tighten until they are all the way open.

Step 22:
Close the caliper! These ones seemed to close a bit easier than the rears. Re-attach the pivot bolt to the slide pin. Again, use some locktight. Torque to 74 ft-lbs on the slide pin, and 148 ft-lbs on the bracket.

Step 23: Re-attach your wheel and then do the other side.
Step 24: Take your truck for a drive and check it out. With EBC you have a "bed in period" of about 1000 miles. It means brake like a grandma... no sudden stops. You can also hasten this by doing a "Pro cut lathe" job. I have one booked for my truck.
All done!! Unless you are me....
-----
I came across a horrible problem when I did my brakes. On my test drive I noticed a horrible screeching and howling from the rear. I'll cut to the chase on this one and not give you the two day run down it took to solve this.
The rims, which were aftermarket 17" (for winter) were now rubbing on the caliper (the banjo bolt to be exact). I guess the tolerance is so tight that the new brake pad width pushed them together. I ended up carving a groove into each rear wheel:

To fix I installed wheel spacers of 1/4". It goes to show you that swapping to aftermarket wheels must be done with great care.
My inspiration to install these brakes, and my review of them, can be found here:
http://chevyavalanchefanclub.com/cafcna/index.php/topic,110817.0.html
This thread is only meant to describe the install process, so please keep questions related to that.


")
 they got new toys but i doubt they came without an a$$ chewing for not maintaining the old one