• If you currently own, previously owned or want to own an Avalanche, we welcome you to become a member today. Membership is FREE, register now!

What did you do to your Avalanche today?

Last edited:
If you want to go with Remanufactured shocks, the Arnott AS-2708s are for sale on Amazon for $227 each.

I lubed the hinge and springs on the midgate flap. Now I don't have to push it down by hand.
Hey, Thanks. I already ordered and received my new shocks. When I realized I needed to replace them I figured from what I had read here I would go with the Arnott and I looked at them closely. When I saw they were remans I just wasn't sure, mostly just not knowing what they do or to what extent. Do they just replace the bladder, do they cut them open? Went with the Monroe for the hell of it. Try something different. Not the cheapest but this is my baby. Will probably get the compressor from Arnott some day. This one works but sure is noisy. I appreciate the suggestion though!
 
Thx BainMan . That will go on my list. Unfortunately, I don't think that will give me cold air. But I would like a cabin filter.
Went to a wrecker Pick n Pull yesterday. They had 4 avalanches, 1st gen. and they had been picked nearly bare. Was in search of a Temp Control Unit but no luck. Only got a washer fluid resevoir. Mine leaks and maybe cracked.
Today I went to change heater hose connections. Of course it couldnt be that easy lol. Changed the connectors at both ends and both hoses. Flushed the core and then the radiator. Had some old dirty green coolant. Added new 50/50 DexCool coolant.

I first noticed stain from heater hose leak onto a coil.
View attachment 232902

Kit of rings to release connections.
Also works for heater, a/c and fuel lines with quick connects.
View attachment 232903

Y-connection at the water pump. Mine broke from a slight pull.
Buy this as a molded piece, already connected.
This is pump to heater core and pump to reservoir.
View attachment 232906
How did you get the heater hoses off from the firewall connections??
 
Nothing too exciting but I had the spare tire fixed due to a slow leak and noticed how much flaky rust there was on the frame and cross members above the tire. The rest of the frame forward still has a lot of the original paint on it. Spent a few hours with the needle scaler and knocked off the loose rust. Washed it down and ready for some POR-15 tomorrow. Damn salt!
 
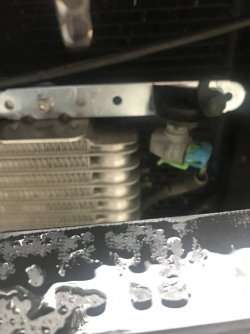
Yesterday, I finally found the time and the weather was nice, so I installed the Tru-Cool - Max LPD47391 47391 Low Pressure Drop Transmission Oil Cooler into the 2003 Avalanche Z-66.

In addition to the transmission oil cooler itself, I had purchased a box of Derale 13017 Transmission/Engine Oil Hose, a Hayden Automotive 397 Transmission Line Fitting Kit and a TRU-COOL TRANSMISSION COOLER BRACKET KIT - 99-07 GM TRUCK from Glenn's Auto Performance.

I've had these parts sitting around for some time now.

Having not previously removed the front grill on the Avalanche, this process was a bit unnerving as I did not want to cause any damage, if possible.

So far, it appears no damage was done, but I plan to reinstall the grill in a day or two after I make sure the cooler installation is leak free.

If everything goes well and I can get the grill back on with no drama, then I will call this installation a win.

So far, so good.

With the cooler bracket kit, this installation could not have gone much easier.

The bracket kit is well designed and complete.

I highly recommend anyone doing this install to plan on purchasing this kit.

Using the supplied parts from the cooler kit and the bracket kit, I only had to come up with some zip ties to complete the installation.

One modification I did was I used one of the supplied brackets from the transmission cooler kit to relocate the ambient air temperature sensor to a new location.

The cooler bracket kit comes with a lower mounting bar that replaces the entire lower brace for the radiator support that normally is the location for the ambient temperature sensor and that factory bracket is discarded.

I used one of the unused mounting brackets that came with the transmission cooler kit and made a couple of notch cuts to the bracket to accommodate a couple of small bumps on the upper left mounting bracket on the cooler, to provide a place to relocate the sensor.

I also used my Dremel to grind off a small spot on the rear of the hood release lever to provide additional clearance between that lever and the top of the transmission cooler.

I could probably have gotten away without that grinding, but I felt it was better to be safe than sorry.

The bracket kit comes with all of the brackets, bolts, washers, nuts and standoffs needed to properly mount the cooler and accommodate the power steering cooler bracket and bolt.

One tip I found helpful was plan to use a Sharpie to mark the exact location of the hood release bracket and remove that bracket to allow for better access to insert and mount the transmission cooler.

Things get too tight to slide the cooler into place once the hose barb fittings are installed on the cooler and those barbs should be installed before mounting the cooler.

You should use care to make sure you do not twist around anything concerning that cooler.

And MAKE SURE you use TWO wrenches to install the hose barb adapters onto the cooler and don't smash them down.

Don't put any undue pressure on the ports of the cooler.

I saw a couple of Youtubes where the installer just smashed down on the barb adapters and ended up ruining their cooler.

The instructions clearly warn of this.

While the instructions for the cooler indicate you can mount the cooler with the ports in any possible orientation, I chose to mimic the factory cooler orientation that I have on my EXT, with the ports on the bottom.

This appears to also be the preferred orientation from the cooler manufacturer, so I will go with that, as well.

They mention something about possible debris settling in the bottom of the cooler if it is mounted with the ports upwards or something like that.

What I know?

I used the Hayden line fitting adapter to connect to the upper radiator cooler port to route the transmission fluid leaving the radiator cooler to the Tru-Cool and then ran a hose back to the transmission return line.

This also appears to be the manufacturer's preferred method and that is how the factory aux cooler is routed on my EXT.

Good enough for me.

A tiny shot of WD-40 on my finger and then applied to each of the barbs and onto the transmission cooler return line helped in getting the hoses fully installed.

Mounting the hose on the transmission return line was a bit of a chore and care was used to not bend or damage the existing line.

Just spray a tiny shot of WD-40 onto the line and into the end of the hose to help with the installation.

I managed to slide the hose about an inch and a half onto the end of the return line.

Plenty of room to install the hose clamp behind the return line barb.

The cooler manufacturer also states in the instructions to not double hose clamp, so that is what I did.

The box of hose I bought provided plenty of hose to route the supply and return hoses just like I wanted.

I routed both hoses past the lower part of the right side radiator flap without having to cut anything.

The a/c lines run in this same area.

Once installed, I zip tied both hoses to secure them from moving around or contacting anything that could do damage.

I also would like to suggest that you plan to go ahead and remove the entire air cleaner box to allow for easier access.

So, with the install complete and everything except for the grill buttoned up, I ran the engine and shifted through the gears then checked and topped off the transmission fluid.

I ended up adding exactly one quart of transmission fluid to accommodate the added capacity of the cooler.

Driving around town produced no leaks and the transmission temperature stayed very low.

With warmer weather predicted and a couple of freeway trips coming up soon, I hope to get a good reading on what to expect.

In reality, with the age and mileage of this transmission, I am just waiting for it to need a rebuild.

My plan was to have the cooler in place when the new rebuild is installed to help protect that one.

But, I had the time and equipment so I figured it could not hurt.
 
A quick measurement of the Tru-Cool shows it to be about 23" x 7.5".

It is much larger that the stock factory unit and should be a nice upgrade from that.

And of course it will be an even better upgrade on a truck with no factory aux cooler, like my Avalanche.

While I was out there, I took a quick snap of the bracket I used to relocate the ambient air sensor.

IMG_5916.JPG

Sorry for the blur, but it was raining.

:) (y)
 
I took the Avalanche on a 90 mile, mostly highway, road trip today.

While this was not in the high heat of summer and neither was I towing anything, I have to say I am extremely impressed with what I saw in regards to transmission temperature.

For just a little background to hopefully give a fair comparison, both the EXT with the factory aux transmission and engine oil coolers and the Avalanche with neither, are geared the same at 3:73, so engine RPM ranges at any speeds are the same.

Both trucks have the 4 speed transmission with the EXT having the 4L65E and the Avalanche with the 4L60E.

There is not enough difference in the two to make any difference.

The EXT is all wheel drive and the Avalanche is two wheel drive.

My experience has been when fully warmed up and under normal, non-towing situations, the EXT's transmission temperature consistently runs 90 degrees above the ambient outside air temperature, year round.

On a 65 degree day like today, the transmission temperature would sit at 155 degrees.

A 90 degree day would get you a 180 degree transmission temperature and so on.

When towing my Party Barge in the heat of summer, I could count on the transmission temperature running 5-10 degrees above that, but have not really experienced much more than 200 degrees.

The transmission temperature in the Avalanche, under the same normal driving circumstances, would run at least 150 degrees during the winter months and close to and maybe excessing slightly 200 degrees during the higher heat of summer.

I have yet to tow my Party Barge with the Avalanche.

The transmission gauge needles on both trucks sit slightly below the 100 degree mark when the transmission is stone cold.

For today's test run, the outside ambient air temperature was 65 degrees and it was raining.

The speed range for the majority of the trip was between 55 and 80 of steady Interstate driving with moderate traffic.

Once I arrived at my destination and was back again in my home town, the driving was normal city surface street speeds and conditions.

Now to the punch line.

Once the Avalanche transmission had a chance to get fully warmed up, the gauge needle rose up the dial and sat squarely in the middle of the 100 degree mark and never wavered.
 
Once the Avalanche transmission had a chance to get fully warmed up, the gauge needle rose up the dial and sat squarely in the middle of the 100 degree mark and never wavered.
Is there such a thing as too cold for a transmission? I think the manual notes normal operating temp of 180F when checking the fluid level, but maybe that's just due to the fluid expansion/contraction due to temperature change and not necessarily the health of the transmission.
 
Is there such a thing as too cold for a transmission? I think the manual notes normal operating temp of 180F when checking the fluid level, but maybe that's just due to the fluid expansion/contraction due to temperature change and not necessarily the health of the transmission.

I'm willing to chance it.

I'll let you know if the thing freezes up.

:)(y)
 
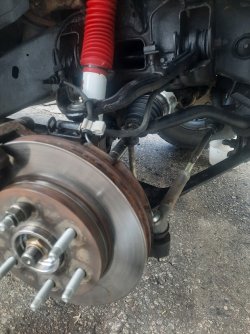
Late posting but I finished replacing my hubs, axles and seals on the front end.
If you recall I had a little accident on the first attempt, smashing my hand with a hammer and getting stitches. All healed up now.
Anyway with a little more care I got it done on jackstands in the driveway.
Old and new
20220423_174753.jpg 20220430_182619.jpg

The drivers side was pretty easy and I did that first.
Passenger side was more difficult. To replace the seal. I pulled the drive axle but it would not go back in all the way. A washer falls of the end of that axle inside the differential. I had to pull the axle housing and put it together properly, and reseal the housing to the Diff.
20220430_182703.jpg
It is much easier if you just do this in the first place, pull the housing with the drive axle together. Pound out the axle and replace the seal, and bearing if needed. Put the axle back in with gear assembly. Remember how it came apart. Oil resistant gasket maker and remount. Not too bad.
Also take off both sway bar links until the job is done. The passenger side required the shock off to remove the cv axle.
I cleaned up the brake calipers and replaced gear oil and transfer case AutoTec 2
and cranked up the torsion bars till the bolts had about 1/2 inch left.
What I didn't do yet- axle bearings , they seem ok and I couldn't get a proper slide hammer atm.
Also didn't replace the new Tranfer case motor I bought for $300. It started to work the last couple months everytime I tried 4wd. So I'll keep the new one as a spare. Thats another big job anyway and might as well replace u-joints while I'm there.
 
I took the Avalanche out for another 80 mile round trip drive today.

It was sunny and 77 degrees.

The drive was almost entirely on the Interstate with speeds ranging from 70-80.

The transmission temp rose to what you see in the picture and stayed there until I returned home.

Not too bad.

IMG_5918.JPG
 
Had Nokian Outpost AT Tyre's installed.
 
Front brake rotors and pads. Ended up with Brembo; cheaper than OEM; cheaper than parts store branded platinum line. Stock calipers.

I was getting a brake-shimmy when stopping, especially at highway speed. The new rotors and pads are smooth as glass, and have firmer 'bite' when starting to brake. No more steering-wheel shake!


The kit I purchased:
I also bought rotors and pads for the front. But I went with OEM. Haven't installed yet...maybe this long weekend.
Replacing sway bar end links and bushings too.
7-C4-BEE39-52-B1-4-EC8-970-E-9-D531263-D4-B1.jpg
 
Last edited:
Also, since I had the infamous crack at the edge of the passenger airbag and the whole dashboard was always kinda shaking and not very sturdy I took the part with the vent opening and also the center speaker out to "investigate".
No wonder it cracked in that area - along the airbag it is solid under the dashboard plastic, whereas from the airbag on across the dash there is very little support for the plastic dash.
Below the dash is the plastic ductwork for the front and windshield vents, pretty solid plastic. So I used some foam pipe insulation, cut sections of it off and kinda filled the gap between the plastic ductwork and the dashboard until it felt sturdier from the top.
Reassembled everything again and it feels and behaves much better now, no more shaking and rattling while driving. When you press on it now, it is almost as solid as around the airbag. And the crack is as good as level now and closer together.
Here is hoping that a sturdier dashboard might prevent more cracks down the road (pun intended)...

Fritz
Can you describe how you filled it in with the insulation? I would like to do the same.
 
Back
Top