• If you currently own, previously owned or want to own an Avalanche, we welcome you to become a member today. Membership is FREE, register now!

Energy Suspension polyurethane bushings

Djurre-Avalanche

Full Member
Joined
Aug 6, 2009
Messages
272
Location
Amersfoort, The Netherlands
Hello AVA brothers,

I'd like to buy polyurethane bushings for my front and rear swaybars and my endlinks, but i really don't know what to buy?
I asked Energy Suspension, and this is what they wrote me:

"Please measure the bar diameters then go to energysuspension.com click on the download catalog section see page 56 2w or page 59 4wd this will show you  all that we offer"

I don't have a clue?

Can somebody help me out?

2003 Chevrolet Avalanche Z71 (4x4 GT5)

Thanks

 
Check over at www.rockauto.com, there will be 2 diameters since you have a Z71 you will need the larger ones.
 
I tried rockauto before, but it seems i can't find the right bushing for the endlinks, i haven't found the right bushings for the front and rear swaybar either..

Can you help me out on that website?

:dunno:

Help is much appreciated..

2003 Avalanche Z71
 
Which Brands are you looking for Rock Auto does not sell energysuspension

They have RAYBESTOS, MOOG and MEVOTECH
Sway bar bushing
http://www.rockauto.com/catalog/x,carcode,1411894,parttype,7624


End links RAYBESTOS Part # 5451642
http://www.rockauto.com/catalog/x,carcode,1411894,parttype,7580
 
I think the main problem will be if they ship to the Netherlands where Djurre-Avalanche lives.
 
Buy ENergy suspension PN 3.5214
http://www.energysuspensionparts.com/proddetail.asp?prod=3.5214

THis one is for the 32mm sway bar which is what My 2002 Z66 has.

Installed today with hand tools and floor jack to help

Do one side at a time.
Turn wheel to side you work on.
Use slip lock pliers to hold upper funky OEM nut thingy.
9/16" socket on bottom and loosen until top nut thingy is off.
Let bolt fall out bottom.

If links and bushings stay that is ok for now...

Crawl undr and use 10mm to remove stock Bar bushing clamp.
2 bolts use a bit of penetrate oil to help...

Once out replace with one in the kit.
I put split to bottom like stock.
Good to clean bar and apply a bit of grease to keep quiet
New bushing has grease zert for future greasing.

get floor jack and on side you are working on
under door jack up on frame about 6" or so.
You will know how much is enough when the links fall out...
if not go and check and pull the old stuff out..

Then insert new but put bolt in from TOP and down.
Make sure you have
Bolt - cap - bushing - BAR END - bushing - cap - tube - cap - bushing - LOWER A ARM - bushing - cap - nut

Sucks when you forget one.

Tighten up but make sure bushing small od is seated into hole in bar and a-arm...

do not tighten all the way...

Lower jack..

Then snug it up making sure - do not overtighten one side more than other..
I measure thread sticking out... and made sure the tube could spin using my pliers... Snug but not TIGHT..

Repeat other side...
Clean up and drive!
 
Good info ygmn, I replaced my front sway bar also and use a solid one and lost the stock junk.

But :nopics:
 
My stock bar is solid...

no pics hands too dirty... and really nothing special to do...

I replaced since peice of the stock one had fallen from the upper end down to the lower like rings....

so it got sloppy...
 
The handling also improved on mine, I did not realize the bushing were shot at 118K.

When I get some time I'm going to take a look at the other ones.
 
One addition to ygmn’s excellent write-up, for Av owners in the Salt Belt:

GM bean counters cheaped out with the puny steel 10mm bolts on the bar bushing brackets. 100% certainty those things are brutally rust-welded into the captive nuts. I managed to get three out, then broke a SnapOn socket on the fourth, and rounded off the bolt. It took six (6) zaps with the hot wrench to carefully back out the bloody bolt with vice grips. We had that sumbitch nut glowing red hot, and the bolt still put up one helluva fight.

So expect a lot of aggro. I had even soaked the bolt overnight in my home brew penetrant (50:50 acetone/ATF). Still had the problem. On reassembly, I chased the threads, used new bolts, slathered them in anti seize and FluidFilm on the captive nuts.

Nice job, GM. By saving $2.09/truck instead of using stainless 13mm bolts and nuts, a 90 minute job turned into hours of aggro.

PRODUCT REVIEW: an extremely cost-effective upgrade that definitely adds to vehicle handling and steering precision. And which can be done with hand tools (assuming no torch required) with no hoist needed. ⭐⭐⭐⭐⭐

Update: I’ve now driven ~1,000 km on these bushings, and I cannot recommend them highly enough. Stupid-cheap upgrade in handling performance 👍 
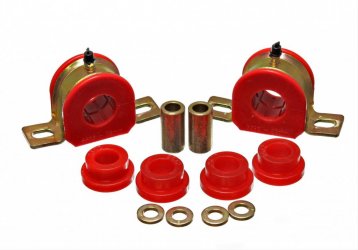
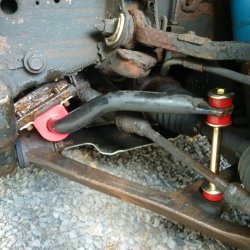
I’ll be installing Energy Suspension’s rear sway bar bushing kit in the Spring when it warms up.

Update 2: I‘ve now installed the rear ES bushings- but this time I hit each of the 10mm bolts with a good blast from the torch before trying their removal. Success👍 . Less noticeable performance results than the front, but I’d recommend them nonetheless as it is a forever solution and if you’re under the truck doing the front bushings anyway...
 

Attachments

  • 0FF0F68E-1032-46B7-88E4-8E3DD7067D86.jpeg
    0FF0F68E-1032-46B7-88E4-8E3DD7067D86.jpeg
    72.3 KB · Views: 34
  • C96FB271-AB15-40DB-9640-458CAFFE53D4.jpeg
    C96FB271-AB15-40DB-9640-458CAFFE53D4.jpeg
    196 KB · Views: 36
  • 99E273ED-7F70-4105-87B5-A3FB20AABBBA.jpeg
    99E273ED-7F70-4105-87B5-A3FB20AABBBA.jpeg
    183.6 KB · Views: 15
  • IMG_20200926_175019.jpeg
    IMG_20200926_175019.jpeg
    118.8 KB · Views: 1
Last edited:
GM bean counters cheaped out with the puny steel 10mm bolts on the bar bushing brackets.
I know this fight, drilled out the forward bolt on each side of the front after those bolts snapped... I have replacements for the rear sway bar sitting new in a box because the rear bolts are rusted too, and after dealing with the front I decided they were good enough for now, ha...
 
Back
Top