• If you currently own, previously owned or want to own an Avalanche, we welcome you to become a member today. Membership is FREE, register now!

My "Knight Rider" Project 2003 Avalanche

redheadedrod said:
The air bag impact sensors are located under the bottom of the radiator mount. If you stand just to the outside of your tow hooks and look towards the opposite side through the hole you should see the sensor. To access it in a Z71 truck you have to remove the front plastic shield that the bumper is also bolted to.

Both of the sensors are then mounted above the round bar that is about 2-3" in diameter right behind where the tow hooks mount. I can try to get some pictures of it tomorrow if you want.

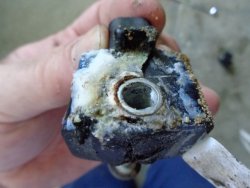
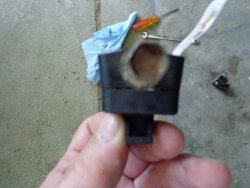
I am going to swap the sensors and see if the code swaps sides. If that is the case Rock auto has these "impact" sensors for about $50+ shipping.

Rodney
pictures would be awesome! I'm just wanting to know with building my bumper.  Making sure there still in a useful location in-case I were to need them knock on  wood I hope not.
 
Have been too busy with end of semester stuff and its been raining here hard so I haven't gotten back to the impact sensor stuff...

I did install the new Spyder knock off LED tail lights.. Look nice but not sure about loosing the cruise control. I expect it to be a load resistor issue but these are supposed to have them already on them...

Rodney
 
redheadedrod said:
Have been too busy with end of semester stuff and its been raining here hard so I haven't gotten back to the impact sensor stuff...

I did install the new Spyder knock off LED tail lights.. Look nice but not sure about loosing the cruise control. I expect it to be a load resistor issue but these are supposed to have them already on them...

Rodney
No worries dude I think I may have found them is it like a grey cover with a yellow sticker on it?
 
They have a yellow locking tab on them.. I will try to get pictures of them in a day or two and post them. But they are on the bottom of the radiator housing and one on each side. Rectangular in shape about 1" by 2" long from what I could tell.

Got a response back from the tail light suppliers. They are sending me a load resistor and told me where to put it. Same place as another member had to put one on his truck..

Will have to take a picture when I get it cleaned up. You can see my backup lights clearly now because the lens it totally clear.

Rodney
 
redheadedrod said:
They have a yellow locking tab on them.. I will try to get pictures of them in a day or two and post them. But they are on the bottom of the radiator housing and one on each side. Rectangular in shape about 1" by 2" long from what I could tell.

Got a response back from the tail light suppliers. They are sending me a load resistor and told me where to put it. Same place as another member had to put one on his truck..

Will have to take a picture when I get it cleaned up. You can see my backup lights clearly now because the lens it totally clear.

Rodney
Yup ok I know where they are now  (y) your describing what I'm thinkin about.  Man if something gets through that on my bumper is serious
 
Final exams beginning of next week so I won't be doing much this weekend on my truck.. Cluster is going out more and more. Acts like a bad solder joint. I talked to my GF's buddy that is a top mechanic at a local chevy dealer and he told me he can only program a cluster that has 0 miles on it and can set it to the current milage. So I might just redo this 2500 cluster I have and install that...

Going to plug it in and see if it lights up before I go to the extent of installing new LED's and motors on it.

Will likely pick up a new overlay for my truck. I found a nice white gauge one for $80 but heck for $20 more I can get a nicer US SPEEDO one.
Going to try finding the bad solder joint on my main cluster... Found another thread where it was talked about and where they fixed it. Time to grab my magnifying glass and look at them to find the bad boy.

While I am at it I might as well fix the bad solder joint in my mirror too...

With finals done next week I will be parking the truck to work on it and drive by back up vehicle. I need to pull the interior to rewire my console for the sub woofers and pull the factory sub woofer. This will allow me to move the amplifier from under the passenger seat back into the console and move the accessory add on I have from interior of the dash to the console where the sub was.

Waiting on Load resistor for tail lights and will be setting up load resistors on the front so I can install the LED fronts I have had for a while.

I will likely be setting up some wiring so I can snoop on the databus on the radio to amp and RSA systems when I get to that too...

Other pending projects is installing projector LED's into some cavalier headlights for my backup vehicle and then figuring out how to shoehorn these JW Speaker headlights into the housings. I have some ideas and it may entail totally ditching the reflector body and most of the black trim that mounts infront of it. I will need to make a new trim piece for it but I may also look at installing additional lighting if I have the room. I MAY be able to sneak in a cube but not sure. These lights seem much bigger than the 3.5" that they say in the specs...

Rodney
 
Quick update... The cluster repair components all came yesterday.. I have Final exams on Monday and Tuesday so I won't address until wed.

The Load resistor for my tail light came as well...

I tried to resolder all of the 551 resistors but it did not help. I thought it did at first because the dash fired on the first key turn but has not lit up in any since. I will be pulling the circuit board fully apart to look for any cold solder joints on the board and try to save it. Will be looking at the connector next.. I am also pulling off all of my SMD LED's to insure they are not interfering in any way. I have some 12 volt LED's to use just in case I get it working again. My backup 2500 cluster does work but it is showing 100,000 less miles than my 1500 cluster. I will likely pull all of the motors off and upgrade them if I can get the old cluster to work. Otherwise they are going into the backup cluster and going in. Either way I have decided to put the backup cluster together so I can use it if need be.

I also did order a new Dorman Cluster overlay. It has white on the gauges and black on the other lights. Give it a little different look without going to the US Speedo overlays.
 
sounds like you have been fighting the electrical gremlin also  :E: but sounds like your getting it all sorted out.
 
Yup one way or another I will get it done...

DDM has new switchbacks I am thinking about picking up.

With the semester coming to an end I will be able to tear into my interior again... Hoping to get everything working together right.

The only real gremelins right now are the cluster, impact sensor and cruise control and I already know how to fix the cruise control. Will likely do the all on brake/turn mod when I install the load resistor.
 
redheadedrod said:
Yup one way or another I will get it done...

DDM has new switchbacks I am thinking about picking up.

With the semester coming to an end I will be able to tear into my interior again... Hoping to get everything working together right.

The only real gremelins right now are the cluster, impact sensor and cruise control and I already know how to fix the cruise control. Will likely do the all on brake/turn mod when I install the load resistor.
Nice I have AP tests in two weeks after that I'll getta just relax and get back to workin on the truck maybe FINIALLY figure out why I don't have reverse lights or dome lights any ideas on that?
 
I am in college... Just sayin'

Almost 100 credit hours done. i need about 140. Then will look at getting a masters.

As to dome light.. Maybe check dimmer switch on headlight switch?

Reverse light if not bulb issue check fuse and there should be a relay for them
 
Are the blue led's on your cluster stock? or did you change them out?  If changed, I wonder if you now have a different voltage drop since you changed color?    I doubt you will ever find a cold solder joint with a magnifying glass.  Although some percussive maintenance on the cluster while it is live could cause connectivity.      I had some bad joints on mine causing the PRND321 area not to work, but it was obvious because the board was discolored in this area from overheating.
 
About the dome lights.. Also check the small button left of the headlight switch.. If pushed in the dome lights won't work on 2003 and newer.. The older ones may be the same but one of our work trucks had it and you had to play with it. For 2002 it also took the headlights out of the "auto" mode. The 2003 setup is much nicer.. The button only controls the dome lights.. The Dimmer control will control the dash and the dome light brightness and the switch now controls the auto/manual mode. (resets to auto on 2003 when key is cycled...)

As to the cold solder joint.. Yes I am aware that magnifying glass is a long shot.. But going to TRY to look for brown spots... Could remove the resistors and check each one. They are supposed to be 551 OHM...

The next guess I have is the connector. I have read where they are an issue with other components (like my mirror that also seems to have this issue...)

May not get to this until next week.. Looks like I am installing Security Cameras on the house on Friday and helping to install a Fence on Saturday...

Will try to at least look at the dash cluster this weekend.

As to the LED's they are tied directly to the dash illumination and don't really do anything to the cluster power wise. LED should not affect its operation at all.
MANY places doing the LED upgrade. I purchased these as part of an upgrade/overhaul kit. Won't install them until I get the cluster running consistently though.

Rodney

 
redheadedrod said:
About the dome lights.. Also check the small button left of the headlight switch.. If pushed in the dome lights won't work on 2003 and newer.. The older ones may be the same but one of our work trucks had it and you had to play with it. For 2002 it also took the headlights out of the "auto" mode. The 2003 setup is much nicer.. The button only controls the dome lights.. The Dimmer control will control the dash and the dome light brightness and the switch now controls the auto/manual mode. (resets to auto on 2003 when key is cycled...)

As to the cold solder joint.. Yes I am aware that magnifying glass is a long shot.. But going to TRY to look for brown spots... Could remove the resistors and check each one. They are supposed to be 551 OHM...

The next guess I have is the connector. I have read where they are an issue with other components (like my mirror that also seems to have this issue...)

May not get to this until next week.. Looks like I am installing Security Cameras on the house on Friday and helping to install a Fence on Saturday...

Will try to at least look at the dash cluster this weekend.

As to the LED's they are tied directly to the dash illumination and don't really do anything to the cluster power wise. LED should not affect its operation at all.
MANY places doing the LED upgrade. I purchased these as part of an upgrade/overhaul kit. Won't install them until I get the cluster running consistently though.

Rodney
I have replaced that whole unit with no luck and front ones still work when pushing the manual buttons the thing that really makes me wonder is the passenger side door light turns on when any door is opened but nothing else does :/  :beating:
 
Ill catch you on your thread...

As to my Truck...

I installed the load resistor on the passenger brake light and it works with cruise fine.

I updated this 2500HD cluster I have here with new motors and the 5mm blue LED's they provided. Not liking the LED's they are very dim and more blue than the ones I was using so I am going to try something different. I have some 3mm blue LED's from somewhere else I will try to redo them with. Plus a couple of the gauges that were fine before I put the front cover on aren't with it on. Going to still try to get my old cluster working but this one at least gives me some readings I can use until I can get the old one repaired.

Doing the honeydo list around the house so haven't gotten a chance to do too much but I will be doing the 4 brake and taillight mod tomorrow. I am filming it so I can show on You-Tube how to do it.

When I do it I will be doing it in the safest manner...  The original feeds will still be there for the brakes and turn signals but will be diode protected... I will also be using the diode between the lines as the mod does and the trailer lights will also go to the bottom lights for the turn signal and brake setup. The only change I will be doing is adding a fuse and diode to the line from the trailer brakes so that the trailer lights are protected from the truck and vise versa. For anyone that MIGHT tow I STRONGLY suggest adding the diode and fuse to the 4 brake light and turn signal mod...

I will also be redoing my FTDL and All on hi mod. The method shown online here stresses the BCM and could damage it causing hundreds of dollars of damage to repair so I am separating it all. I will be documenting with pictures and video. I will post the pictures here and in the proper threads and post the Youtube links.

Once I have that done I will try addressing the cluster again. We are expecting rain the rest of the week so I am going to try to jam  out whatever I can before that starts up. I have some computer projects I need to work on otherwise so I won't be bored.. LOL

I also put money on a kickstarter for a 4.3" screen to add to my truck. It does everything in the screen so all you need to do is talk to it. I am hoping that it will allow me to use a much cheaper computer to control features on the truck. This will get installed in my over head console and eventually replace the HVAC controls and some other stuff. Basically it will be my simple non-pc based interface to talk to the truck. This will allow me to also put in a screen where the current HVAC and radio are now.

I will also be working on mounting my amplifier for the under seat sub woofers that I have not hooked up yet. I stripped the socket from a non working BOSE amplifier and will make a cable from the extra console wire harness I have and make the connections I need for the sub woofer amplifier and test it out. I will be pulling the high level audio out from the bose amplifier to the sub and run this to my amplifier to run the other subs. I will also pull the amplifer on signal from there as well. Note this is a temporary setup until I am able to decode the GMLan for the radio accessories. I want to be able to eventually control the amplifier, RSA and XM radio from a PC... This will also allow me to build a board if I decide to that will allow aftermarket radios to work with factory appliances as well.

Rodney
 
Ok, Got the 4 brake light, 4 turn signal mod done...

Was a pain because I had to run the passenger side wire to the turn signal from the drivers side rail underneath the truck. I ran it in the wire harness that holds the turn signal wires from the drivers side to the passengers side...

As it turns out you can probably do your trailer light/turn signal portion of the wiring under the truck where the trailer light harness and tail light harnesses separate.

You could probably do ALL of the wiring for this modification under the truck but you will want to use weather sealing heat shrink tubing to do so and other weather proofing techniques.  Would be easier to bring the wiring up into the tail light cubby and do everything there since it is relatively far away from most weather.

Ended up having to drop my spare to access the wire harness that runs over the top of it so I had to cut the bracket that holds the original spare (that still is holding full pressure...). Will be looking for a new spare tire carrier... If it has the secondary latch I will likely disable it so it doesn't corrode up again.

On to redoing the all on high and full time DRL... I took pictures while doing the mod so I will share those soon enough.

Rodney
 
Well I modified my secondary battery system.. I think it is pretty much done for now.. I didn't take pictures at the time...

I also replaced my Impact sensor on front right.. Wow, I am attaching pictures of the one I took off.. it is supposed to be rectangular.. The old one was severly distorted and had some hard white stuff caked on. Almost looked like it was something from within the sensor.. You can see the label that was on it hanging off since the front of the sensor swelled out so much it pushed it off. Sucker took me 20 minutes to unbolt too. The new one I was able to finger tight and tighten with a wrench in less than a minute once I found the slot for the peg...

Important thing is my "Service Air Bag" light is out now...

I took pictures of the other one and it still looks like it should...
 

Attachments

  • DSC00094 (Small).JPG
    DSC00094 (Small).JPG
    78.1 KB · Views: 181
  • DSC00095 (Small).JPG
    DSC00095 (Small).JPG
    82.2 KB · Views: 180
  • DSC00096 (Small).JPG
    DSC00096 (Small).JPG
    91.7 KB · Views: 180
I also installed LED turn signals on my truck although these only have like 9 LED's on them.. I installed the load resistor and they are working great...

I also installed a couple switchback strips I have. I temporarily taped them to the power bar under the turn signal to see how well they light up in the daylight. My Intention is to edge the top and bottom of the new headlights I am building with these strips. I have two more strips..  I am considering switch back Halos on the LED projectors as well... The intent will be that they will work together.. Then I probably should get switch backs in the normal turn signal locations too.. Thinking about painting the turn signals... I will tape off the side marker light and reflector and tape off a chevy emblem on the front so there is a clear chevy symbol on the front but paint the rest totally black. Thinking of getting some plasti-dip to do a trial run on them first though...

But here is what it looks like for now.. Probably will pull the strips off before nationals.

One picture is with the parking lights on and the other is with them on and the hazards flashing. Happened to catch the flash at the right time.

Rodney
 

Attachments

  • DSC00109 (Mobile).JPG
    DSC00109 (Mobile).JPG
    75.1 KB · Views: 186
  • DSC00110 (Mobile).JPG
    DSC00110 (Mobile).JPG
    72.4 KB · Views: 182
Oh yea got my cluster fixed too... I hit a milestone a couple days ago... Not sure I like the white needles on the white background.. 

Thinking I am going to change to blue needles since I have blue back lighting. Going to talk to the guy that rebuilt mine and see if he can add more LED's since the ones in there are not quite bright enough. I used the same LED's TREY used in his truck but you need to double them up... This guy also uses SMD resistors which is different than in the thread...

Note the speedo IS correct... I was on my way to work and grabbed this photo when the traffic was clear.. I was not looking at my phone and had to take 3 pictures before I got this one...
Also the Air Bag is now cleared with the new impact sensor as mentioned earlier...

Rodney


Attachments

  • 2015-06-01 15.01.07 (Mobile).jpg
    2015-06-01 15.01.07 (Mobile).jpg
    56.2 KB · Views: 181
redheadedrod said:
Oh yea got my cluster fixed too... I hit a milestone a couple days ago... Not sure I like the white needles on the white background.. 

Thinking I am going to change to blue needles since I have blue back lighting. Going to talk to the guy that rebuilt mine and see if he can add more LED's since the ones in there are not quite bright enough. I used the same LED's TREY used in his truck but you need to double them up... This guy also uses SMD resistors which is different than in the thread...

Note the speedo IS correct... I was on my way to work and grabbed this photo when the traffic was clear.. I was not looking at my phone and had to take 3 pictures before I got this one...
Also the Air Bag is now cleared with the new impact sensor as mentioned earlier...

Rodney
That's a lot of cool stuff! Glad I'm not the only one with a lot of miles and still upgrading it a lot!
 
Couple of updates....

Will post pictures soon... Spending all of my spare time modding and fixing and haven't had time to post pictures...

Redoing my All on High mod to use seperate relays and will be BCM safe...

At this point I used a bunch of 16 gauge wire of different colors... 3 small DEI relays (20 amp for NO contact which is big enough for this job.), 5 inline fuse holders, 2 diodes, heat shrink tubing and some electrical tape...

The headlights all have a separate 10a fuse for each light. I am tapping into the fuse box and grabbing the High Beams supply voltage... Since there are two different lights I used diodes to allow me to pull the signal even if one of the fuses is blown but not backfeed into the other line if the fuse is blown.

I use the high beam signal to trigger the low beam relay and the foglight relay.

I will trigger the DRL relay from the output of the Headlight relay.

The Foglight relay and DRL relay both have fuses inline prior to the fuse on the COMMON for the switched side. (10A for DRL, 15 for Fogs)
The outputs from those relays will tie into the supply voltage lines for the DRL and Fogs and basically are in parallel.

The low beam will have a 20A fuse inline prior to the COMMON line for the switched side. The NORMALLY OPEN line will feed the two 10A inline fuses which then go to separate lines that go to each of the low beam head lights. The NO line will also feed the trigger for the DRL light.

The grounds will all be grounded to a bolt on the fender and the positive feeds will all be combined in one ring and attached to the main feed into the fuse box.

I also talked to my Cluster guy and I am not liking how dim my dash is. I am going to have him put some different LED's in the dash and I may go with a different overlay.. if I do I will have this overlay available at the national GTG for sale. I believe it is the same overlay as in the northface clusters.
 
Personally, I'm not sure if you will like the light housing without at least the front bezel in place. I'm not done with my headlights yet because I am still waiting for the headlight tint film and the butyl tape I ordered. I plan to cover the with LED ring with headlight tint so it doesn't look so white. I'm hoping that they will be here by this weekend so I can finally put this together The butyl tape is on the UPs truck for deliver today however the tint film is still in the postal system somewhere. My tracking only shows that it was accepted in Chicago, IL on the 16th and 3 days should be enough time to get to MN so I'm keeping my fingers crossed. anyway here are some pics to compare my headlight with and without the bezel in place.

21C110FC-526A-4CA1-8E5E-96B81BB6DBBF_zpsiipbiz6b.jpg


04E292B0-3DD8-430D-B20C-F172B182BFB4_zpsbumja2n3.jpg
 
Not sure yet what I am doing with mine. I have some ideas but have to develop them. It will have something in the front but not sure yet what.

Rodney
 
When I was shopping around for my seat covers, I found out that Coverking normally sells the Neoprene seat covers for around $213.00 a row. So for a full set for the truck you'll be paying roughly $425.00 + shipping.

Anyway I also found out that Sam's Club has this deal where you can buy Coverking Neoprene seat covers for a deep discount in the store. Since they are custom made seat covers made only upon ordering, Sam's club does not have the actual seat covers on hand. Rather they have a CoverKing Product card that they sell for $99.00 $89.00. Each card is for a row of seats of your choice, either front or rear. The card has a code on it that you use when you call up Coverking to order your seat covers. Buy 2 cards for a total of $178.00, give them 2 codes on the phone and you'll be getting a full set of coverking seat covers in the mail for less than the retail price of 1 row.

Sadly this card is for the neoprene and Ballistic seat covers only. If you are interested in the leather seat covers like I was, this offer does not apply to you.

Capture2_zpsfec65530.png


They do also sell these for $135.00 at Sam's if you're interested in these designs instead.

Capture3_zps2130aeb8.png


Note: these prices at Sam's Club was from the last time I checked for Dakotawilk almost a year or so ago. They could be back at $99.00 and $150.00 by now.
 
Back
Top