• If you currently own, previously owned or want to own an Avalanche, we welcome you to become a member today. Membership is FREE, register now!

My New Bumper Build by Brute Force Fab

I spoke with Billy this afternoon on my way into work....I work nights....and he's still on track.  He has been working on some Toyota orders as well.  He told me he has the front bumper welded up on the inside and plans on getting the outside welded tomorrow and Saturday.  It is currently off the truck.  The rear bumper is the same.  The swing-outs for the rear bumper will get worked on this weekend or early next week.  The plan is to have them both to the powder coater by next Friday.

The parts for the roof rack have started coming in as well.  His part-time help will be in on Saturday and between the two of them they hope to have the front bumper welded up and the roof rack fabricated. 

I told him how much this site loves (demands?) pictures.  He promised me he would try to send some pictures to me overnight.  So hopefully I can have some posted tomorrow or Saturday. 
 
I don't have any new pictures of the current condition of the build, but Billy sent me some pictures of the construction framework underneath the front bumper. 

Not only is Billy lacking in social media and internet skills, but he lacks in the photography department too.  Guess it's a good thing he knows welding and bumpers.
 

Attachments

  • Untitled.jpg
    Untitled.jpg
    94.5 KB · Views: 146
Got some post-powdercoating photos from Billy this morning.  He's hanging the front and rear bumpers today.  Monday I fly back to Fresno and pick up the truck and bring her home.  It's been a long four weeks, but the worth looks like it will be worth it all.
 

Attachments

  • front bumper 1.jpg
    front bumper 1.jpg
    96.6 KB · Views: 125
This came out great!  I still need to call Billy and these pictures are motivating me to do so.  I can't wait to see pictures of both bumpers on your truck.
 
Here's a shot of the inside of the front bumper showing the light mounts, winch mount and overall construction of the inside of the bumper.

Billy had a graduation party to attend yesterday, so he's hanging the rear bumper today.  Not sure I'll have any pictures or not.  I fly down tomorrow to get the truck and start my drive back to Boise with a stop over in Reno.  Hopefully I can get some overall pictures of the truck and bumpers up on this thread in the next couple days. 
 

Attachments

  • Untitled.jpg
    Untitled.jpg
    94.3 KB · Views: 109
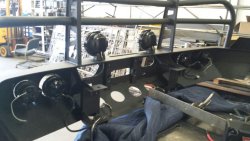
I got home yesterday afternoon after driving my truck back from Fresno.  I split the drive by staying overnight in Reno this time instead of one long push back to Boise.  I flew down first thing Monday morning with Billy picking me up at the airport at 10:30 am.  His shop is about 5 minutes from the airport.

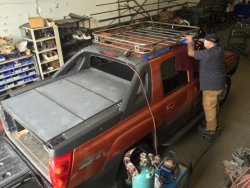
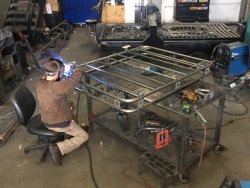
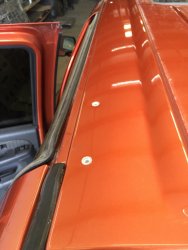
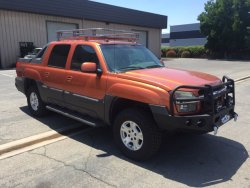
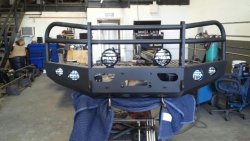
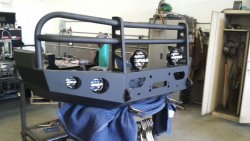
Originally, I only had plans for a front and rear bumper for the truck.  But I added a custom roof basket to the plans after dropping the truck off and seeing the baskets Billy does for Toyotas.  The plan was to install the basket in a similar fashion to how he does baskets for his Toyotas.  But late last Thursday night, he discovered that wasn't possible due to the design of the Chevy door frame and how the doors close on the frame.  He didn't realize this till he had the basket built.  See, he had to build the basket first to get the points for the mounts lined up with the doors.  Kind of backwards maybe, but he'd never done this on a Chevy before.  Anyway, this screwed up getting the basket powder coated with the bumpers on Friday.  So in all the pictures you'll see that the basket isn't powder coated and that's why.  Ultimately, Billy knocked some money off the price of the basket since he didn't get it powder coated and I'll do that here in Boise.

Over the weekend I researched other options to mount the basket so it wouldn't go to waste.  Billy wasn't going to charge me for the basket if I couldn't use it.  I could have just walked away from it, no harm, but I really wanted this basket.  With the height clearance being an issue for me, the truck and our garage, doing a Yakima/Thule mounting system wouldn't work.  I didn't have the clearance.  In researching other mounting options, I learned it is possible to use wellnuts (or other similar nuts) to mount the basket where the factory rails would normally go.  Billy was okay with this as he does it to Toyotas, but he was reluctant to do it to my truck without me standing there giving an "okay."  So we waited till I got into town, looked things over and gave the "okay."

This means the basket is not quite finished as we ran out of time to put a windscreen on the front before I had to leave to make it to Reno at a reasonable hour.  When he found out the basket wasn't going to mount as expected last Thursday, we both gave up on it.  This made for a loud drive home. 

I guess this is just the trial and tribulations of doing a custom job for the first time. 

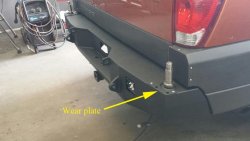
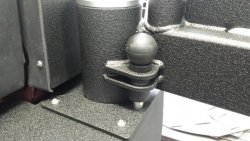
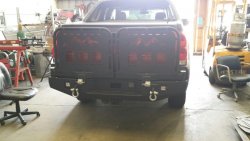
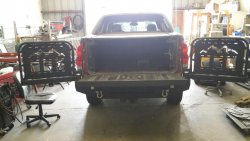
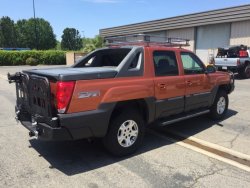
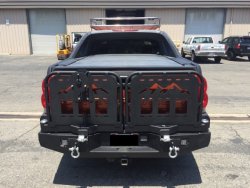
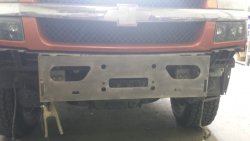
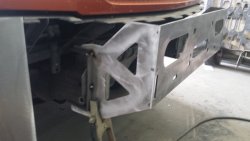
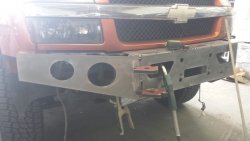
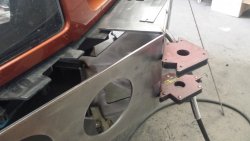
I'll start with some photos of the rear bumper construction first.  This first picture shows the spindle mounts for the rear bumper's dual-swing out gates.  Yes, I had to give up the steps in the rear bumper for this feature.  No way around it.  Those spindle mounts travel the height of the rear bumper and are welded into the inside of the bumper both at the bottom and top of the inside of the bumper.  Just no way to keep the steps.  With no swing out gates, I could have kept the steps.  But I wanted to be able to take the spare tire out from under the truck and mount it somewhere accessible.  The roof was out as I wouldn't fit in our garage.  And the bed was out as I need the bed for storage and the bed covers for the bike racks.  The only other option was a rear-gate spare tire mount.

You'll also notice I had to cut off the cladding there at the back end of the fenders.  Billy then built a "plug" with sheet metal, had it powder coated like the bumpers and inserted those plugs into the cladding.  Just need a bit of touch up paint on the rivet heads.

Also of note is the "wear plate" around the spindle mount that is screwed onto the bumper.  This is a replaceable wear plate for those times when it gets so scratched up from use I can put a new one on.  This way the bumper itself doesn't get scratched up from the gate's lock pin moving back and forth from opening and closing.
 

Attachments

  • rear bumper spindle mounts.jpg
    rear bumper spindle mounts.jpg
    90.3 KB · Views: 93
A view looking down on the finished spindle mount and a closer shot of the plug in the cladding.  That silver cap on the spindle housing is removable.  It just unscrews.  Then a nut inside it can come off and the gate lifts off if I ever need to remove the gate for some reason.

The pin hole on the right is the opening stop for the gate at 90 degrees, and the one to the left is the opening stop for 135 degrees.
 

Attachments

  • rear bumper close up of the spindle.jpg
    rear bumper close up of the spindle.jpg
    92.5 KB · Views: 91
With the gate open at 90 degrees, you can see the spring loaded pin here.  There is no pin hole at the closed position as the gate is locked shut with a clasp when it's closed.  The clasp also as the ability to have a padlock placed on it to keep anyone from opening the gates as well.
 

Attachments

  • rear bumper pin.jpg
    rear bumper pin.jpg
    94.4 KB · Views: 90
The completed rear bumper. 

Both gates are mirror images of each other.  This allows for a module design for whatever I want to put on the back gates.  This photo shows no mounts on the back.  With Billy's new plasma CNC machine he recently purchased for his shop, he was able to cut out any design I chose into those gate panels.  I gave him about 8 designs to choose from, depending on what would fit with his mounting plan.  In the end, we chose the Avalanche mountains.  I thought that turned out great!

He re-used the rear bumper factory spare tire access door.  The factory hitch was untouched by this installation as was the factory trailer plug-in.  The only thing not re-used was the rear bumper license plate light.  He put a new one one later as the license plate isn't in this photo.

The new rear lights are Rigid Dually flood lights.  They do not come on in reverse.  They will have their own on-off switch in the cab.
 

Attachments

  • rear bumper gates closed.jpg
    rear bumper gates closed.jpg
    92.1 KB · Views: 90
I chose two types of mounts for the back gates.  On the driver side will be the spare tire mount.  This is removable, if necessary.  I probably won't take it off at all.  Billy went out and got three Chevy lug bolts that are mounted on this.  He only had Toyota lugs in his shop.  On the passenger side will be an Aluminess Galley Box.  I can mount either item item to either gate.  I can also add whatever mounts later on that I would like.  Two spare tires?  No problem.  Build my own mount for whatever specialty item I want?  No problem.

The galley box has four mounting points fixed onto the box.....Billy added those as the box comes with no mounting points so you can do what you want with it.  The galley box is also lockable. 

I wanted the spare tire on the driver side since it will partially block the view in the rear view mirror and my blind spot is on the passenger side.
 

Attachments

  • rear bumper with mounts.jpg
    rear bumper with mounts.jpg
    88.3 KB · Views: 89
Here are gates open at their max 135 degrees.  At 90 degrees the tailgate comes down normally with no obstruction.
 

Attachments

  • rear bumper gates at 135.jpg
    rear bumper gates at 135.jpg
    92.5 KB · Views: 86
As mentioned earlier, the basket wasn't done till Monday after I arrived in town.

Here's Billy spot welding the legs in place. 
 

Attachments

  • basket billy spot welding the legs.jpg
    basket billy spot welding the legs.jpg
    90.9 KB · Views: 87
Billy's "shop foreman" Spencer putting the final touches on the legs.
 

Attachments

  • basket getting legs welded.jpg
    basket getting legs welded.jpg
    91.5 KB · Views: 87
And finally, the moment of truth. 

In the famous words of Grand Moff Tarkin, "I'm taking an awful risk, Vadar.  This had better work."
 

Attachments

  • basket first hole.jpg
    basket first hole.jpg
    94.9 KB · Views: 87
In theory, this should be fine.  This area of the roof is double walled, no different then the area around the door seal.  These are the same inserts Billy uses on Toyotas and he's had no issues with them.  They aren't GM Wellnuts, but they function the same way.  We inserted the nuts with silicon for added water proofing.  When the basket is installed and finished, the legs will have a rubber pad under it to protect the paint (we put temporary rubber pads on for the drive home) and I'll lock-tite the screws in and apply silicon to the legs as well.

Functionally, it should be fine.  The important thing is to keep the water out and not to overload the basket. 

I'll put lighter items up there like folding chairs and bags.  If I keep the weight under 200 lbs, I don't see an issue.  Does anyone else notice anything I may have missed? 

The basket will also have work lights up top as well.  A 2-row, dual flood/spot light bar in front and cube lights on the side and rear.
 

Attachments

  • basket finished inserts.jpg
    basket finished inserts.jpg
    91.5 KB · Views: 88
Once everything was ready to go, we backed her out into the sunshine for some final shots.
 

Attachments

  • finished passenger front quarter.jpg
    finished passenger front quarter.jpg
    97 KB · Views: 85
Rear quarter shot.  That's Billy's Tacoma in the background.
 

Attachments

  • finished passenger rear quarter.jpg
    finished passenger rear quarter.jpg
    88.9 KB · Views: 90
Back
Top