• If you currently own, previously owned or want to own an Avalanche, we welcome you to become a member today. Membership is FREE, register now!

Nav System Tech Info..

OnStar VCIM Wiring (Gen 5 & 6.x)

Click on the image to expand it.

 
SP250 Location

The view orientation is Rt. front fender looking through the windshield toward the left rear seat.

SP250 appears as a disconnected connector.

Click on image to enlarge (Big!)


(1) Instrument Panel
(2) C202
(3) SP250
 
Splice Pack 207 (SP207) Wiring

Splice pack 207 is a Class II DATA BUS hub for mostly entertainment devices (Except the HU).

Click on the image to expand it.

 
SP207 Connector View
 

Attachments

  • SP207-Connector_View.gif
    SP207-Connector_View.gif
    12 KB · Views: 2,137
Splice Pack 207 (SP207) Location

Splice pack 207 is a Class II DATA BUS hub for mostly entertainment devices (Except the HU).

Click on the image to expand it.


(1) Splice Pack SP207
(2) Relay Block - I/P
(3) I/P Extension Harness

The parking brake pedal mechanism/frame is on the left of the image.
 
RSA Controller Connector Wiring

Link to Premium System RSA Wiring
Link to Luxury System RSA Wiring
Note that these links may not point to the exact point where the posts start; it's the area.

Click on the connector image for a larger view of it.
 

Attachments

  • RSA_Controller_Conn_Chart.gif
    RSA_Controller_Conn_Chart.gif
    12.6 KB · Views: 2,229
UQ7 Bose Luxury System Y91 Speaker Wiring

Click on the image to expand it.
 
UQ7 Bose Premium System Speaker Wiring

Click on the image to expand it

 
Console Woofer UQ7

Click on the image to expand it.
 
DVD disk, release version 5.0

Nav_DVD%20V-3.0.jpg


Part number: 15906573 (DELPHI Version 5.0) 03~06.


Part number: 15934919 (DENSO Version 2.0) for 2007

Denso & Delphi Nav DVD's are NOT interchangable - (to date).


Connector terminal R&R


The top two images expand; how, depends on your browser.

Carfully remove the retainer:
index.php


You push aside the latching tab with either the removal tool or a very small flat blade screwdriver, like this:​
index.php


Observe the catch tab. It is supposed to be straight, with a slight bend toward the right (as you view it) from it's base. It isn't a contact (except for probing and testing), it's just a "catch" tab!​

Don't over-do it, all that is necessary, is to hold each wire in their cavity while you work with the others.​

Chime_Mute-5r.jpg


When you have moved/placed them all, re check the positions carefully in good lighting. Some colors are close. Install the retainer, re check if you want.
 
INFO:

Document ID# 1579504​
 
03-05 Chevrolet/GMC/Cadillac/Hummer H2 All Full Size Utilities with RPO UM8 Hum or Fan Noise - kw navigation radio entertainment temperature heat hot #PIT3328 - (Dec 22, 2004)

The following diagnosis might be helpful if the vehicle exhibits the symptom(s) described in the PI.

Condition/Concern:

Customers may comment of a hum or fan running type noise from the navigation radio.

Recommendation/Instructions:

This noise is normal. The navigation radio has an internal cooling fan to cool the radio's internal components.

Please follow this diagnosis process thoroughly and complete each step. If the condition exhibited is resolved without completing every step, the remaining steps do not need to be performed.

Models:

(03-05 Cadillac Full Size Utilities with RPO UM:cool: and (05 Chevrolet Full Size Utilities with RPO UM:cool: and (05 GMC Full Size Utilities with RPO UM:cool: and (04 - 05 Hummer H2)
 
Supplemental for Luxury consoles:

Bezel Replacement - Floor Console (Luxury Upper)

Removal Procedure

  1. Remove the I/P cluster bezel. Refer to Bezel Replacement - Instrument Panel (I/P) Cluster

Click on the images for an expanded view..


  2. Insert a flat bladed tool between the Bezel assembly and the console.
  3. Pry the bezel from the console outwards partially in order to gain access to the connectors.
  4. Disconnect the electrical connectors (1).
  5. Remove the bezel from the console.

Installation Procedure


  1. Place the bezel to the console.
  2. Connect the electrical connectors.
  3. Install the bezel to the console by pushing on the corners until the retainers (1) click in place.
  4. Install the I/P cluster bezel. Refer to Bezel Replacement - Instrument Panel (I/P) Cluster .
 
RSE DVD Video outputs.

The image expands; how, depends on your browser.
 

Attachments

  • 1399557-04_RSE_Video_Outs.gif
    1399557-04_RSE_Video_Outs.gif
    35.4 KB · Views: 2,012
Here's a couple of tips, posted in another topic by member: gburnsky..


Here's a couple of things that may be of help.

Tip # 1208746  ???

Removing the connecting pins from 24 pin connectors.

Forget the pin extractors, screwdrivers, paper clips and all the other gadgets used to remove the connecting pins from the 24 pin connectors, the tool is already included with the 24 pin connector.

The blue pin retainer on the 24 pin connector (the part that looks kinda like a blue comb) works great for inserting into the connector and releasing the pin connectors, just turn it perpendicular to the connector and insert the first "tooth" of the "comb" into the release hole and the pin connector will almost fall out.  Seems like it was made for this.

Just wish I would have known when I started, not on the last two pin connectors I removed. :E:

PinExtractor.jpg


------------------

Tip # 1208747

Removing the plastic to install the in-dash CD changer.

If you have a gun type soldering iron laying around, flatten the standard soldering tip with a hammer to make a blade (they also make special tips for cutting plastic) and use it to melt/cut the plastic.  No dust or plastic pieces flying around, OK a little smoke but not bad.
 
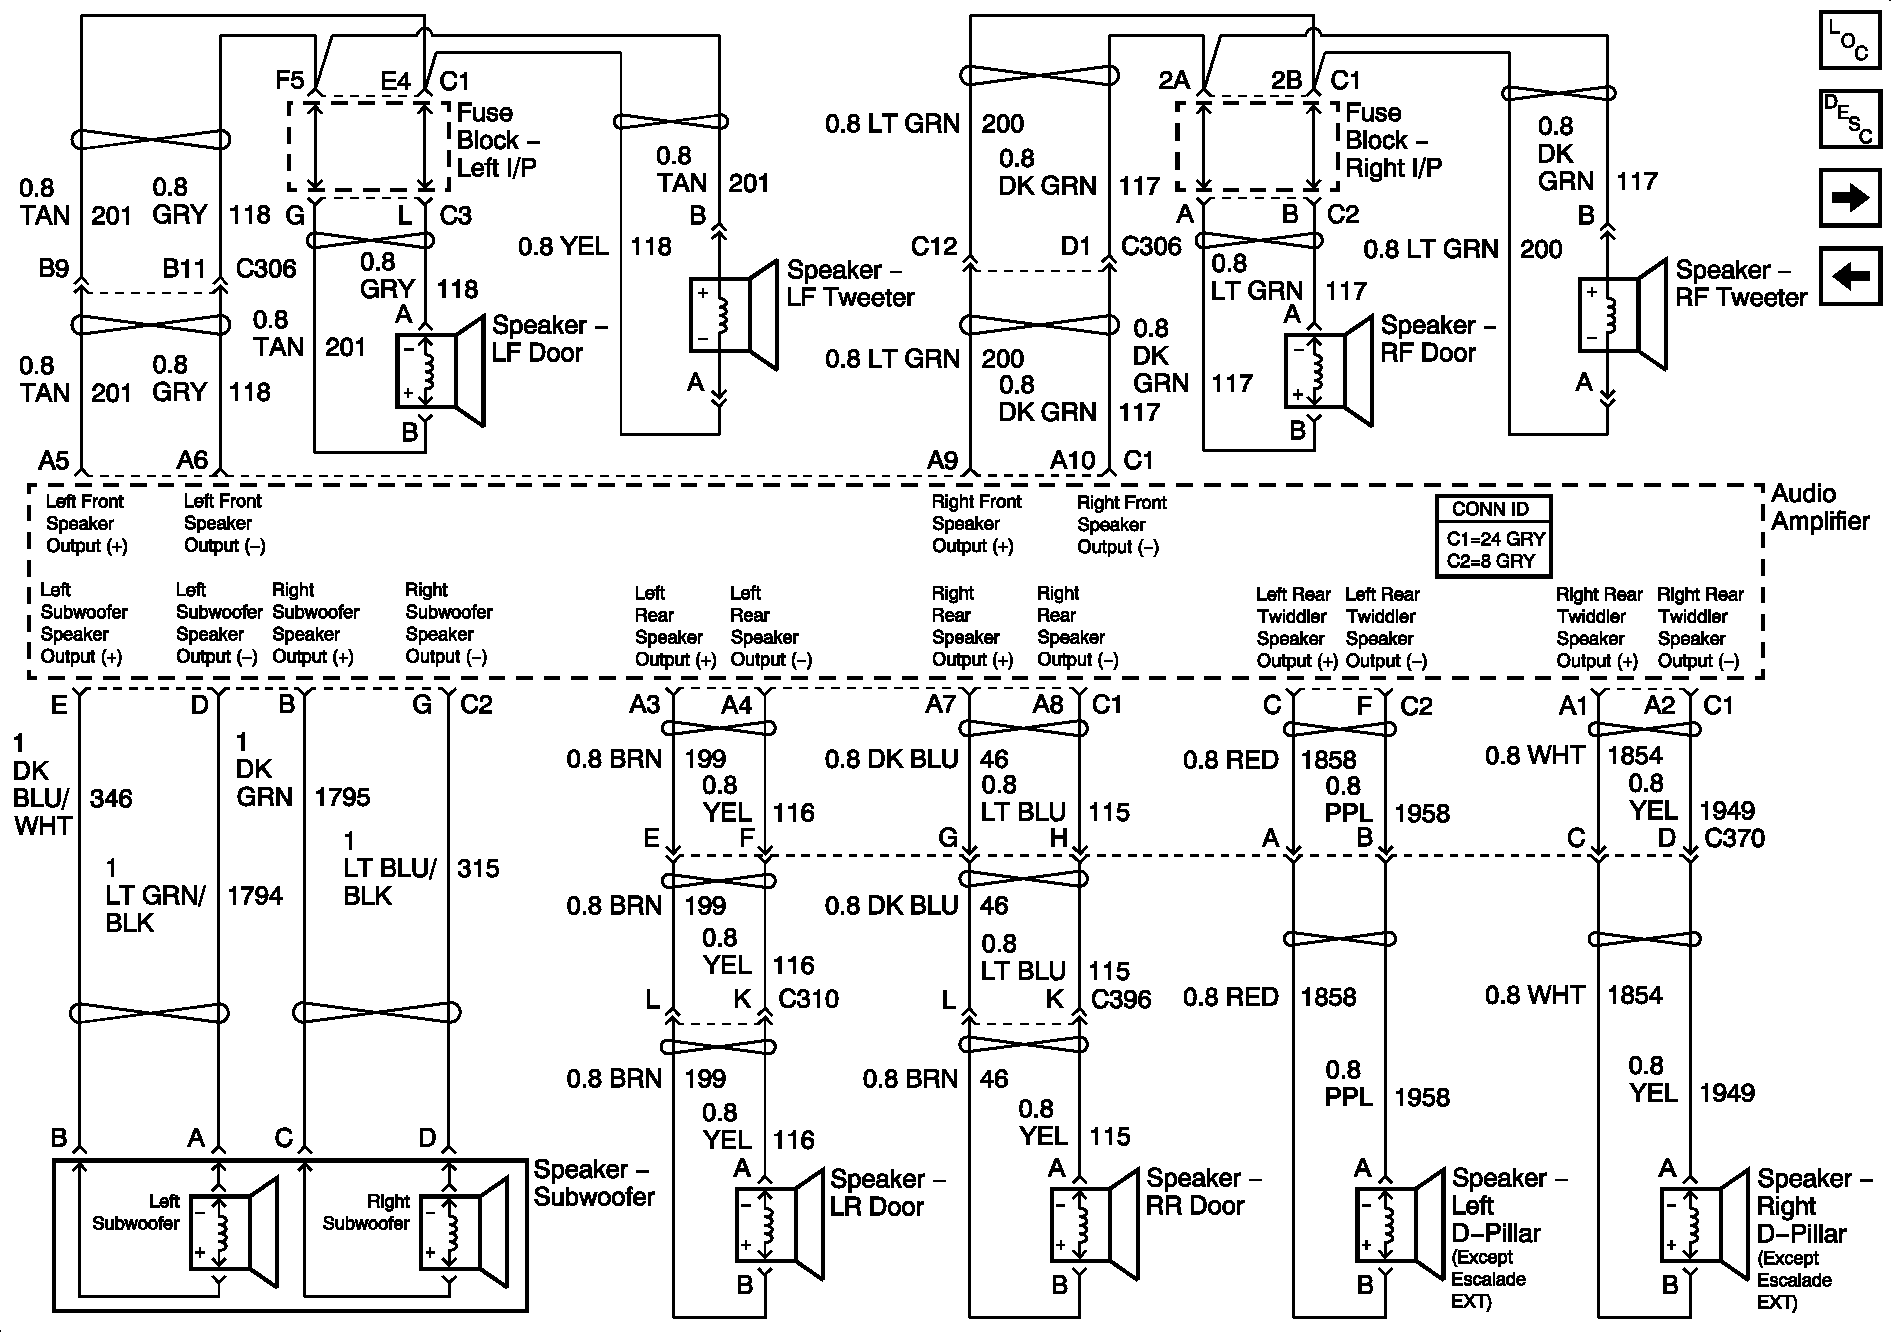
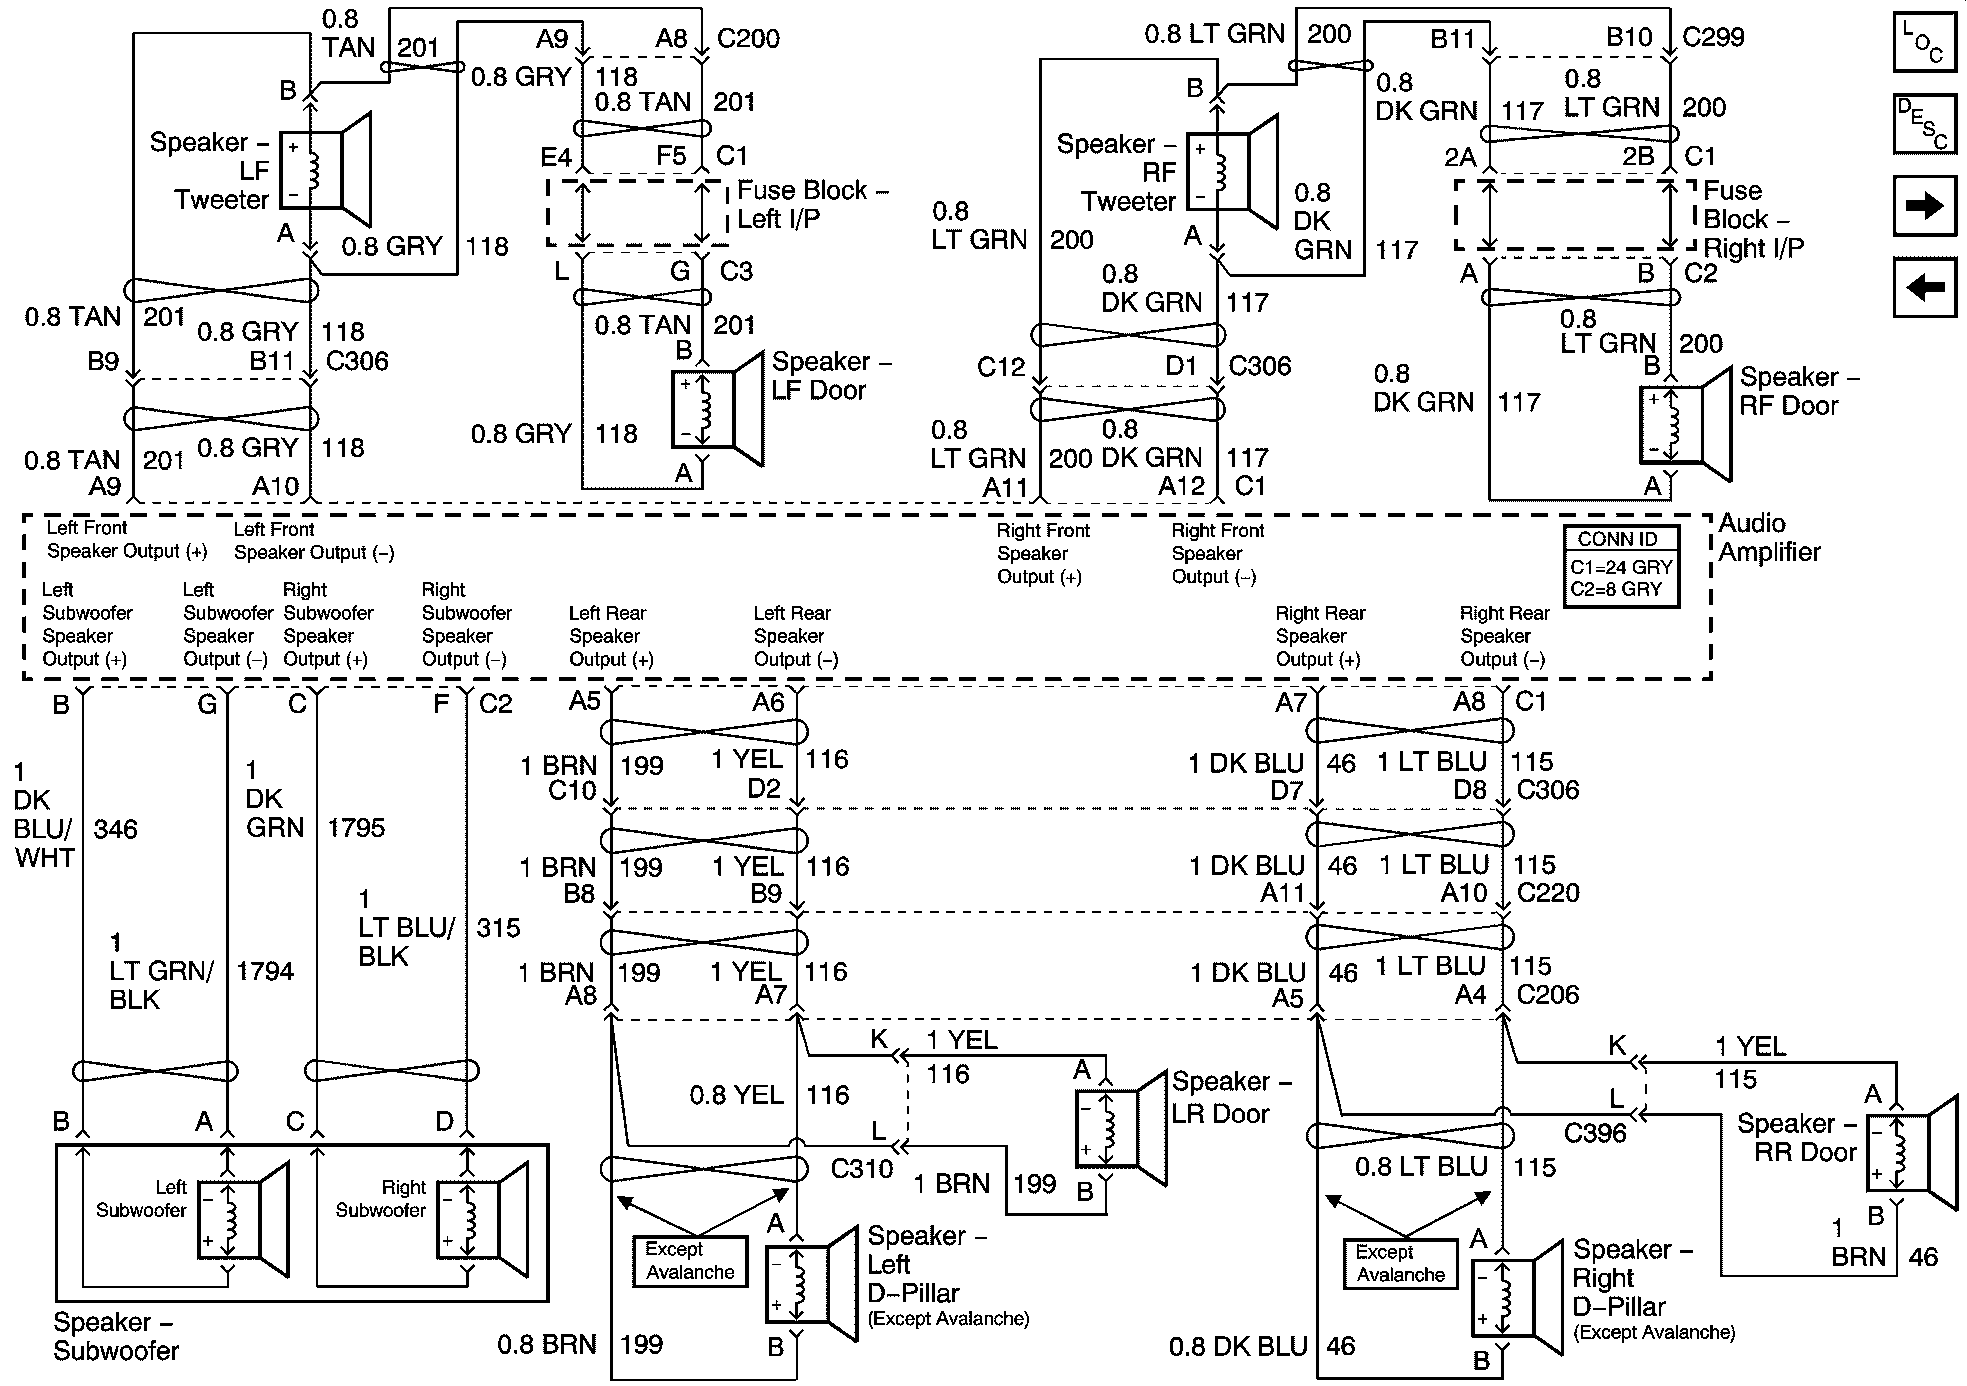
Here are some audio system differences in the 03~06 truck models.

Most all of the GM trucks use the Basic or Premium system; the luxury model trucks use of course the Bose luxury audio.

In a Basic system, there is no external amp; the HU connects directly to the speakers and there is no SubWoofer.

--------------

In the 
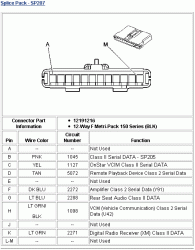
Bose Premium System, The amp is just an amp - no smarts but to amplify and provide some woofer crossover. The audio controls and eq are in the HU. Chimes are also generated in the head unit. The radio and aux audio levels vary with the volume control. The chimes, OnStar and Nav audio are set separately and switched/mixed in the common audio to the amp, where no further adjustment is needed.

Automatic volume is set by the VSS signal (the one encoded onto class II bus - low priority).
This is the "Speed Compensated Volume" you have in the Bose Premium System.

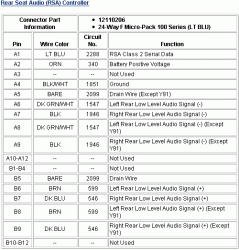
A separate rear channel output pair is routed through the RSA and then to the amp for the rear audio.

This system and the basic system makes it much easier to replace or (basic system, add) an aftermarket amp.

--------------

In the Bose Luxury System the audio from the head unit is of a flat line level, unprocessed and not volume-controlled format. The HU only switches in the selected mode, OnStar, Nav, which external audio in, and such.

The luxury system amplifier is a high-quality "smart" class II data controlled amp. It receives the volume control & eq - etc. audio settings information from the head unit via the class II bus to set the particular EQ, volume & such which are all processed in the amp. The chimes are generated in the Bose Luxury System amp also.

The automatic volume control is by the Bose AudioPilot system. This uses a sampling mic for ambient noise pickup. The link describes the rest better. It is noise compensated, not speed compensated.

The output quality is far superior to the premium amp. Much less THD and crossover distortion and a bit more power. BUT, the same speaker set and passive crossovers in the pillar tweeters as the premium system uses, are still some of the Bose limitations. The Woofer output is clean, but still Bose controlled. It can be boosted/amplified, but I doubt one could alter the low pass for a lower frequency capability. Unless it's within the adjustment parameters of some setup software.)

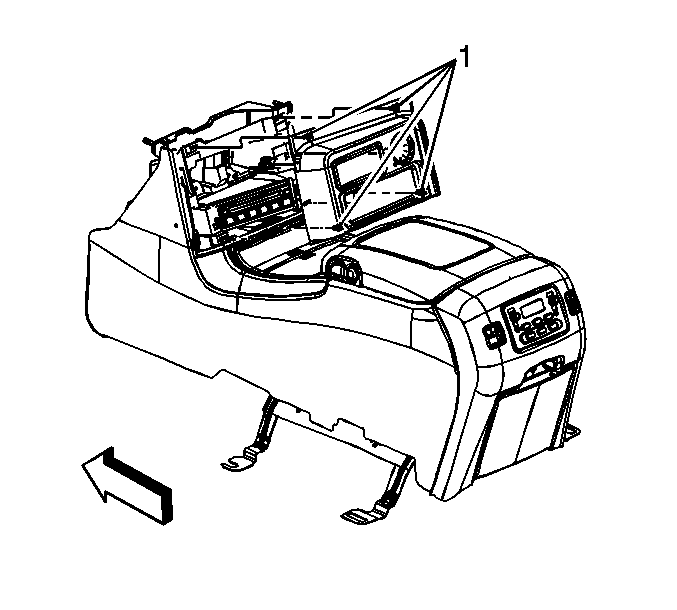
This system is quite difficult to replace the amp with an aftermarket unit. The entire audio system is removed instead. Or otherwise the amplifier is retained and used, as it's needed to process the audio.

 
Back
Top