• If you currently own, previously owned or want to own an Avalanche, we welcome you to become a member today. Membership is FREE, register now!

What did you do to your Avalanche today?

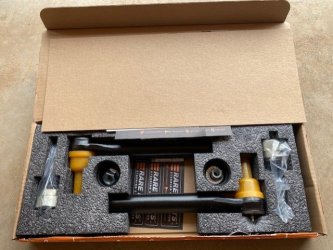
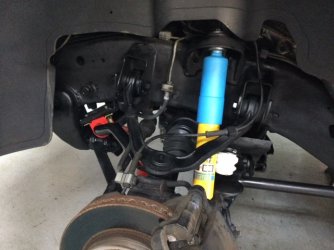
I LOVE white avalanches! Here's some pics below. One is of my left front after reassembly. Didn't bother doing anything to the calipers because I'll prob replace them (already did the rears a couple of years ago). Today, got the spare wheel done. I used the Duplicolor Storm Grey Metallic, based on a video I'd seen online. Turned out darker than it looked in the video, but I wanted to see how I liked the gunmetal color with the white. I thought my bride wouldn't like it, but she does and said it makes the truck look mean.
I had used some Rustoleum etching primer, and I don't think the paint and primer were necessarily compatible, as I had a little bit of a reaction when I sprayed the first coat, with some dark splotching. This paint is an acrylic lacquer (body paint) as opposed to their specific wheel paint, which is acrylic enamel. I think I'll continue, doing one wheel at a time, with their Graphite wheel paint, primer, and wheel satin clear coat. Sorry the pics aren't better, but it was hard to get the light right to pick up the color well. What do you all think? Stay with bright silver or go gunmetal? (I don't want to go black)
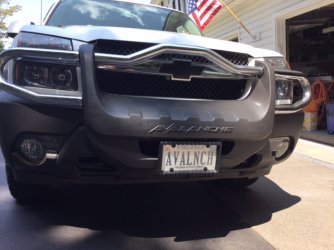
Also, at Walmart yesterday, I found a cool heavy rubber "license plate protector" that I thought would go well with the cladding on the front. It's about 3/4 inch thick and has ribs all around it. Integrates nicely I think.
 

Attachments

  • front end painted.JPG
    front end painted.JPG
    108.5 KB · Views: 25
  • IMG_0416.JPG
    IMG_0416.JPG
    93.2 KB · Views: 21
  • IMG_0417.JPG
    IMG_0417.JPG
    95.3 KB · Views: 22
  • IMG_0419.JPG
    IMG_0419.JPG
    104.2 KB · Views: 21
Too hot today to work on wheels, so my project was the roof rack. I pulled it off, disassembled all of the pieces, cleaned them good and pressure washed the rails. A lot of the anodizing has evaporated off the mounted rails, and the cross rails were getting faded. Pulled the front/rear/center mounting brackets apart and cleaned them inside. The base “gaskets” that they sit in are some kind of hard molded plastic; not rubbery like I thought they would be. Interesting that they are designed with drain channels in them. For what it was worth, I treated them with some Gummi Pflege, some cool German stuff I use on the seals on all the vehicles to keep them pliable.
Soaked all the bolts in rust killer, although they weren’t bad. The threads have some kind of. sealant on them so water can’t get down the nutserts in the roof. QUESTION:: When I put it back together tomorrow, should I put some RTV on them before inserting and tightening for good measure?
Painted all the brackets and rails with satin black Fusion and will let it cure overnight.
Funny thing… all day, I kept looking over at the AV. I’ve never seen it without the rack being up there, and to tell you the truth, it looks naked without it. Somehow, having it up there adds to the purposeful look.
 
Actually, yesterday. Got all the roof rack reassembled and reinstalled. Used Loctite blue on the threads of the bolts on top of the original sealant that was still on them. It looks great! Then, pulled the spare I painted gunmetal and put it on the right rear, and started stripping that wheel for paint. Must have walked out and looked at the gunmetal 100 times, from near and distant, all angles. I'm not feeling it on the white truck. With the cladding and black tires, everything below the beltline just fades to darkness, whereas the wheels used to stand out. Rethinking my color choice to hyper silver or bright silver again. Decisions, decisions :unsure:
 
The Avalanche developed some upper dash rattles lately, so today I pulled the dash pad and had a look.

Five of the six connectors along the windshield side of the dash pad had broken clean off and were allowing the dash pad to rattle up and down at every little bump in the road.

Some sticky backed foam tape I had lying around, placed in strategic locations along each broken plastic tab and all is quiet again.

Pretty easy repair.

Let's just see how well it holds up.

At least now I know where the problem lies.

If I have to repair it again, I will use some more heavy duty foam tape.

:) (y)
 
9B77DA28-A30E-4DBB-B73A-C16E7FFFE7A8.jpegdecided to pull the spare back off the truck, sand it down, and try a different color. This is the Duplicolor Graphite wheel coating, which is a few shades lighter than the Storm Grey I used before. This is an acrylic enamel, while the other is lacquer. Did 3 coats of color and 3 coats of gloss clear. Was thinking about going matte clear, but a lot of the reviews I read said it was milky and affected color, and then didn’t hold up as well as the clear. Have another wheel ready for primer tomorrow and will continue with graphite.
 
I prefer stock...

your painted color disappears and cannot see when wheel ends tire begins nor cladding...

Try WHITE!
 
so now I’ve got one vote for gunmetal and one for stock, or white. My bride thinks I’m spending a fortune running around getting paint 😵‍💫
 
Yeah, i'd have to agree with Ygmn on this one. I've never been a fan of the gunmetal look on brighter cars. FCA loves using the color on their lower trim alloys and I've never cared for it. Personal taste, I like the colors on the vehicle to tie into each other. In the avvy's case, this means a matte grey/ black can work nicely outside of the OEM and bodycolor options. But if you're not careful on the color you wind up with a bunch of mismatched colors going on like FN's firearms. (Which I love, but man their FDE can be questionable)

That said, try using a visualizer to save yourself some wrath. :p


You can set the color of it to match your truck and then try out different wheels for color options. Yeah, i know, it's not perfect because you're altering the wheel shape, but it might help. i swear there was a better visualizer somewhere that let you alter the wheel color itself, but i might be mistaken.
 
Last edited:
Decided I didn’t like the graphite color and that bright is bestest. Spent hours last night looking for pics of white trucks with white wheels, and that’s just not popular, I guess. So, went through the process of stripping the spare back to bare metal. That was a job! 3 coats of etching primer, 3 of storm grey, 3 of clear lacquer, 3 of graphite, and 2 of clear enamel. That primer was the hardest to get off.
Made an executive decision not to paint…but to polish. Watched several polishing videos and decided that would be better for me than paint for a few reasons: 1) can still pressure wash the wheels as needed, 2) don’t have to worry about the outside wheel weights that are on there now, 3) don’t have to worry about paint flaking off or chipping.
There is some question about whether you can clear coat over polished and if it would stick. A lot comments about lack of adhesion and clear coat turning yellow over time, plus chipping and flaking.
I’m a Griots Garage fan and have used their stuff for about 30 years now. I went on their website and found a question about what to use on polished wheels. They suggested their poly wax or their 3-in-1 ceramic spray. I use both of those. The ceramic stuff is so slick, water won’t stay on the car to wash it. So, it should be a pretty good coating for the polished aluminum. I’ll use both, as I’ve done on my cars and the AV.
Went to Walmart and purchased a Mothers Power Cone and some more Blue Magic polish, so will start tomorrow. I did part of my other stripped wheel this morning with my Griots 3.5” orbital and an orange pad, and it started coming out pretty smooth. Got the spare sanded this afternoon with 400 and 1000 wet/dry. Also stripped and sanded the metal part of the center cap. Here’s a pic of my starting point.
77351701-278D-453F-81D9-DDDE3F4C35CC.jpeg
 
Both of my trucks have plain black painted steel spare wheels.

I usually clean my spares really well at least once a year when I drop the spare to test and service the hoist.

Even with the generally dry and certainly not salty road conditions we have around here, those spare wheels still get mighty dirty.

When I first got each of these trucks, the upper side of each was deep in caked on road dirt and rocks.

And neither of these trucks off road more than to drive across the lawn.

At least not since I have owned them.

I guess the previous owners never saw a need to drop those spares.

I would rather not have to gouge out caked on dirt and rocks on the side of the road while having to deal with a flat.
 
Yeah, mine was originally a steel wheel, and it got really rusty too. I picked this one up at a junk yard because I knew the alloy wouldn't rust through. I drop it regularly to make sure the lift and the emergency catch work right.
 
Too hot today to work on wheels, so my project was the roof rack. I pulled it off, disassembled all of the pieces, cleaned them good and pressure washed the rails. A lot of the anodizing has evaporated off the mounted rails, and the cross rails were getting faded. Pulled the front/rear/center mounting brackets apart and cleaned them inside. The base “gaskets” that they sit in are some kind of hard molded plastic; not rubbery like I thought they would be. Interesting that they are designed with drain channels in them. For what it was worth, I treated them with some Gummi Pflege, some cool German stuff I use on the seals on all the vehicles to keep them pliable.
Soaked all the bolts in rust killer, although they weren’t bad. The threads have some kind of. sealant on them so water can’t get down the nutserts in the roof. QUESTION:: When I put it back together tomorrow, should I put some RTV on them before inserting and tightening for good measure?
Painted all the brackets and rails with satin black Fusion and will let it cure overnight.
Funny thing… all day, I kept looking over at the AV. I’ve never seen it without the rack being up there, and to tell you the truth, it looks naked without it. Somehow, having it up there adds to the purposeful look.
Brother, I am tired just reading what all you did to your AV. LOL. But then, I am old as dirt ha-ha.
 
Well, I’ll be 70 next month, but still going like the Energizer Bunny.
Didn’t get anything done today cause I had to cut lots of grass and already have a maple that is dumping tons of leaves to get up. Yesterday, spent most of the day playing with polishing the spare wheel. All the flat spoke areas and even the metal cover for the center cap polished up very nicely. But looking at the wheel, the rough cast openings between the spokes and the little teardrops do not reflect light like I would like them to. The stock wheel appears much brighter at most angles. So I spent a lot of time trying to sand a few of them, all the way to 1500 grit. Can’t seem to get them smooth enough to polish out well. Tomorrow, I think I’m going to hit Harbor Freight for a cheap angle die grinder and see if I can find some of the 3M Scotchbrite Roloc Bristle disks. I think my local NAPA might have the yellow ones. I’d never seen these before but was really impressed looking at some videos, especially for cleaning gaskets off manifolds and heads, etc. I hope I can work a 2” one into the slots and take the surface down much smoother for polishing.
 
Howdy! ran around and gathered stuff this morning, and then tackled the spare wheel again this afternoon. Tried various combinations of finishing pads on drills and the die grinder. My water separator on my compressor isn’t working right, so it spits water. Aargh. But, took down the openings between the spokes and made them much smoother. For some reason I can’t find a clue on, when I polish those areas, and remove the residue, the metal is smooth but has a grayish tint. Finally washed them with Meguiars wheel cleaner for raw aluminum wheels, which brightened them up some. Here are two pics of the finished spare. Not going to put any more time in it, since it was for experimenting on process. This has a coat of Griots Poly Wax on it, which will cure overnight, and I’ll hit it with the ceramic tomorrow afternoon. Will start on a good wheel tomorrow.
CCD6D5AB-D045-43A5-AE2B-011BAFA2F8AB.jpeg

4EF34E4E-9C96-4594-B8B9-F30990A09435.jpeg
 
Good job with the console vault mod. I think every vehicle with a console should have one! (y)
 
Ha Ha donholco that reminds me of spirited discussions we used to have years ago about storing items in the "hidden secret storage area", some members freely talked about it on this public forum so it's no longer was a secret area to many member's way of thinking.. as it was mentioned then if they knew about it so would the thieves and cops etc. :devilish:
That why a console vault is a small degree safer then thinking you are the only one aware of "hidden compartments".
 
Well, got the first good wheel completed and I think it looks darn good. Did the barrels with 2 coats etching primer, 2 of Rustoleum Aluminum metallic (‘cause I had it), and 3 coats of clear for more protection. Front was stripped, brushed, cleaned, sanded, and polished. It has one coat of Polywax on it. Got that done yesterday and put the first coat of ceramic on it a few minutes ago. Second wheel is ready for polishing on the front, and I’m waiting for primer to dry so I can start the color coat on the back. This is a very labor-intensive process! The little die grinder I got at HF is earning its pay. Here’s a pic. Will clean up the tires when I get done with the wheels.
EEFA6668-803D-40D5-BBF2-56952604F392.jpeg
 
Back
Top