• If you currently own, previously owned or want to own an Avalanche, we welcome you to become a member today. Membership is FREE, register now!

What did you do to your Avalanche today?

After reading all you do, if you are lazy I must be dead.

Let's just say with a little more self motivation, I could do so much more.

:ROFLMAO:
 
I've been accumulating parts for a couple of bigger projects for my 2002 2500, well bigger for me anyway. First is to replace the rear brake backer plates, looks like quite a process.
Second is to replace the intake gasket with the upgraded gm gasket and bolts. Doesn't look too bad, and since I'll be into it I'm going to replace the crank position sensor with the one oring model. I'm thinking it would be easier without the intake in the way.

Winter projects, I'm really not looking forward to starting them but will be glad when it's done.
They make a two piece backer plate for the rear brakes. I did this when I did my brakes a couple years ago. I would not have the ability to do a one piece plate.
 
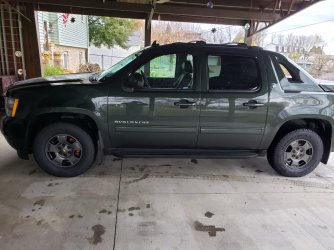
The weather here has been pretty nice so I decided to press forward with the fall detail of the Avalanche over the past couple of days.

Granted, the truck did not need much, but I enjoy the process and it allows me to skip out on other, less enjoyable chores.

This session did allow me to check out the CERAKOTE Rapid Ceramic Paint Sealant Kit that I had previously posted about.

Overall, I will give this product my approval.

I found the product to be extremely easy to apply and it gives an extremely slick and very high level of shine to the painted surfaces.

Now, before anyone wants to bash me for any of the products I choose to use as not being "real" ceramic products, understand that I will not be spending the kind of money that is required to have the high level professional level ceramic coatings applied to my vehicles.

The paint on my truck is not perfect, being 20 years old and having over 270K miles on it, so I am not going to spend more money on a paint coating than what my truck is worth and I am very happy with the products I choose to use.

I do what I can to keep my hoopties somewhat presentable.

With that out of the way, my normal method of vehicle paint care usually consists of first, after a good wash and dry, taking a clay bar and going over the entire painted surface, using the bar with Turtle Wax 53413 Hybrid Solutions Ceramic 3-in-1 Detailer as my lubricant.

Next, I take my DA (dual action) polisher and Turtle Wax 53412 Hybrid Solutions Ceramic Polish and Wax to remove any swirls or other imperfections like water drops and the like.

I finish up with a couple of coats of Turtle Wax 53409 Hybrid Solutions Ceramic Spray Coating.

From time to time between details, I will sometimes hit all of the paint with some of the 3-in-1 detailer and a couple of coats more of the ceramic spray.

For this session, since it hasn't been that long since my last detail session, I opted to only clay bar and polish the hood, which always seems to need it the most, especially since the Avalanche sits out in the weather all of the time.

Also, I skipped the application of the Ceramic Spray Coating in favor of trying the CERAKOTE product.

The CERAKOTE Rapid Ceramic Paint Sealant comes in a kit with a fairly small spray bottle of the product and two microfiber towels.

One of the towels is used to apply the product and the other is used to buff the paint to a very slick and shiny finish.

Do not be alarmed by the rather smallish size of the product bottle.

There is more than enough of the product to fully treat a large vehicle several times over.

The application instructions and video indicate it is OK to apply multiple coats and to also apply more product as desired over time.

During this session, since I am hoping this application will last well into the winter season, I opted to fully treat the entire painted surface of the Avalanche three times with a fourth application to the hood.

The videos for the product indicate that additional applications will add additional protection, shine and slickness to the painted surfaces.

Without the benefit of a gloss meter, I can honestly say that I feel the level of shine and slickness did seem to increase with each additional application.

So much so that I did not feel that any extra applications were a waste of time and product.

I spent a good deal of time looking back at the truck from all angles to appreciation the level of shine I was seeing.

Now, we are due to start having some periods of rain in the near future and I am looking forward to seeing how well their claims of being highly hydrophobic this product really is.

The Avalanche sits outside all of the time and therefore needs a higher level of protection if I am to expect this near 20 year old paint to last.

The Turtle Wax products have served me well.

However, if the CERAKOTE product works just as well, it will now become my finisher each time I detail any of our vehicles.

Having a fresh DA polishing using the Turtle Wax ceramic polish of the hood, did not affect the application of the CERAKOTE ceramic product.

Even though the Turtle WAX ceramic products are also highly hydrophobic, the CERAKOTE product went on just fine.

A few observations and tips:

I would suggest that anyone wanting to apply the CERAKOTE product plan to at least clay bar the paint surfaces first.

While you could probably get away without any additional surface prep, understand the CERAKOTE product is a PAINT SEALANT and it is NOT a product that will do anything to address any blemishes or imperfections.

CERAKOTE tells you right up front that it will apply right over any imperfections, such as water drops and swirls.

I believe this to be true.

If you decide to protect your existing water drops, then rest assured they will probably be there for quite some time.

After reading the instructions and watching the videos, I wasn't sure what the product was going to look like during application.

What I found was the product is applied as a very fine mist that is quickly wiped all over the section of paint that you are working on.

I found that holding the spray bottle very close, within 3-4 inches of the painted surface, allowed for good coverage and less waste.

The mist of the product is extremely fine and holding the spray head more than 6-7 inches away from the paint allows a lot of the product to simply waft away.

Get that spray head close to the paint and spray your application towel down with some of the product before you begin.

The application towel will stay somewhat damp during the remainder of the application, which helps with the process.

After the section of paint you are working on has been covered, immediately take the finishing cloth to buff the product to a high shine.

If you miss a spot, go back and reapply.

Like I said before, I chose to reapply at least three more times over the entire truck.

After applying the product several times over the entire tuck, I feel there is still enough product left to apply a couple of more times.

No need to hold back.

I'll post a picture, but this is from day one and before I reapplied the final layers of the CERAKOTE paint sealant and some CERAKOTE Trim Coat to finish the detail off.

IMG_6129.jpg

I didn't think to get a final snap when I finished up.

But, that doesn't really matter since I feel pictures may not give the best impression of what this product does.

I think it is best experienced in person.

Now, it is time to let this product show me how well it is going to hold up.

I hope it does well, but if it sucks, I'll report back.
 
Well I can thank EXT4ME for motivating me to give the truck a deep cleaning and wax while the temps jumped to the low 70s today! Extended forecast is 30s and low 40s as highs, so this is probably the last thorough hand wash it will get until spring and just rely on the coin spray wash unless we get a day in the upper 40s some time this winter. Maybe I'll get daring and go thru a soft brush automatic wash, which really don't like to use and I haven't used with this truck yet. All depends on that damn salt 🤬.
 
@BainMan I found out the hard way a few years ago that the torque spec on those valve cover bolts is WAY LOW.

They were also not available anywhere, but my mechanic let me rob one off of a truck that a customer had abandoned on his lot.

Whew.

Dodged a bullet on that one.
 
@BainMan I found out the hard way a few years ago that the torque spec on those valve cover bolts is WAY LOW.

They were also not available anywhere, but my mechanic let me rob one off of a truck that a customer had abandoned on his lot.

Whew.

Dodged a bullet on that one.
8 ft lbs... 96 inch lbs... I learned the hard way also, 3 years ago, and have that torque spec memorized now..... One of the bolts on my passenger side snapped off during reinstall.. The broken bolt still had some thread left and just barely catches, that with the other 3 bolts and it hasn't leaked on me yet but I'm still waiting for it to be a problem. I never extracted the few mm's of the bolt that broke off..
 
8 ft lbs... 96 inch lbs... I learned the hard way also, 3 years ago, and have that torque spec memorized now..... One of the bolts on my passenger side snapped off during reinstall.. The broken bolt still had some thread left and just barely catches, that with the other 3 bolts and it hasn't leaked on me yet but I'm still waiting for it to be a problem. I never extracted the few mm's of the bolt that broke off..

Mine broke off during the reinstall, as well.

Luckily, there was just enough still sticking out of the boss that I got the old one out without having to get creative.

Then came the challenge of finding a replacement.

:E:
 
Mine broke off during the reinstall, as well.

Luckily, there was just enough still sticking out of the boss that I got the old one out without having to get creative.

Then came the challenge of finding a replacement.

:E:
I don't break out the torque wrench often, but valve covers are a must!
 
Last week did full detail inside and out getting ready for winter. Yesterday got new tires installed on the winter rims that were just refinished. Of course it had to rain so she is already getting dirty..on the outside. Ready for winter now.
 

Attachments

  • hc_1668195417597.jpg
    hc_1668195417597.jpg
    175.5 KB · Views: 9
Follow up on the detail of my Avalanche a few days back.

I stopped by to take my 84 year old mother to the grocery store.

As I was helping her into the passenger side seat she commented "Your truck sure is shiny. Did you just wash it?"

I'll take it as the truck was more shiny than normal.

And it hasn't been washed since the detail and has sat outside in a couple of rain events.

I'll take that as a positive.

:) (y)
 
Welp I'm back home for the Holiday, back to my batteries woes. I picked up a new one and put it in and she fired right up. XM had to be hit with a new signal the idle was all over the place but it's going through the relearn so that was expected. I have to go through the DIC options but that will be over the weekend.
I don't think she likes sitting that long without a fully charged battery. Still has 141,000 miles for the last 2 years, but she's a very good truck.

IMG_20221123_163013_670~2.jpg
 
I don't think she likes sitting that long without a fully charged battery.
I find this curious.
I disconnect the battery and put the battery on maintainer each fall on both of my Corvettes ('88 and '03).
Neither one exhibits any issues when I hook the batteries up each spring.
 
I find this curious.
I disconnect the battery and put the battery on maintainer each fall on both of my Corvettes ('88 and '03).
Neither one exhibits any issues when I hook the batteries up each spring.
My Av absolutely hates not having a good charged battery. This problem started about a month ago and I did not have time to address the bad battery. I can just drive it for about 5 minutes and it will be fine. You'll notice when the weather starts getting cold the more posts you'll see about not starting, and other electrical problems. Lol
 
I was in the middle of typing a response to an 8 yr old question myself, not yet realizing the age, and just happened to scroll to see if anyone else answered it when I saw this lol...


This has been the single biggest issue I've had with my truck in 6.5yrs.. Tried multiple different wipe on treatments=some two part some single wipe, light sanding, heat gun, and prayer; and honestly nothing worked for more than two or three months. There were a lot that looked better than others immediately after, but faded fast. The only two I DONT recommend: 1.heat gun -and- 2.Wipe New, unless your plastics are in perfect condition, because it left a hard slick clear coat over my lovely spotty grayish finish that took forever to wear off!

A couple months ago, I finally decided to go all in and make the trucks most unsightly flaw it's best looking(or try to anyway). I pulled all of the (supposed to be) black plastic trim pieces/panels off the truck and prepped then painted them with rattle can Dupli-color Bumper and Trim paint. Kind of long process but absolutely phenomenal result so far! Two months in and showing zero signs of UV faded or scuff damage. Curious to see how summer sun and fun treat the finish. If it still looks this good at my first football pregame I'll probably spray them with some matte or satin clear coat and call it done! (process from here on):

Pulled the 3rd break light trim, inner and outer sail panels, storage lids, vents, tailgate spoiler, and panels, along with the mirrors(after multiple 6 month plastidip attempts), and the lower windshield cowling(around wipers and antenna); everything black plastic on mine except door handles and grill. This isn't for the faint of heart lol, esp the sail panels, spoiler and those little vents. It is loud and they flex a lot and your going to break some so **tip- do not attempt in cold air (< 55)** .....and be prepared to make some minor repairs as needed. I read somewhere that if one was super careful they could do it without breaking more than a couple of the retainer clips, so knowing myself, I purchased 30 for about $1.00 a piece from a local Body Shop Supply Store **tip- don't waste time on CHEAP Amazon clips at .10cents a piece** in advance and only broke 11 lol. An 18" prybar covered in tape was my most effective method, placing the tip near where I thought a clip was located and prying off the body produced the least damage **tip- only pry off body in areas that are behind trim and will be hidden by the trim panels just in case. Also, I broke 4-5 out of about 50 total of the little clip position towers or horseshoe shaped clip holder areas or whatever you want to call them on the backsides of the trim pieces as expected. Those were repaired easily with JB Weld for plastics, wood clamps, a couple wood blocks, and a few hours of dry time **tip- indoors= dehumidifier exhaust air speeds ALL drying, prob 10x faster than rice for a phone/electronics. outside= the good old fashioned awesomeness of hot sunlight works even better than dehumid.
To be honest once everything was off it was a little overwhelming, so unless you have the cleaning and drying space and have zero anxiety issues, I recommend doing a few pieces at a time. Cleaning every corner and crevice of all those pieces at once felt extremely tedious but it was necessary as prep is the most important part of any paint job period. Then it all needs wet-scuffed with Scotch Brite or similar 600 grit pads, some type of gritty rubbing compound and warm water; theoretically you could start with the scuffing, it just depends on the condition of the trim pieces. But, if you're OCD(like the author of this novel) and lose sleep over having to do something again because you didn't do it correctly the first time= clean it before and after you scuff it. **tip- before final wash is the time to do any repairs or minor sanding to any beat up areas on side you're going to paint, honestly would only do this to the highest visibility areas like outer sail panels and mirrors, Then laid out about 40sqft of plastic in my driveway started wiping down 6-8 pieces at a time with denatured alcohol. Next was 2 light coats, 3 in a few areas, of adhesion promoter. Then 2 light coats, 3 in some areas, and a final medium coat of the Dupli-color product. **tip= a light coat is not a total covering, it's an approx 60-75% coverage, if item is white and I'm painting it blue you will still see some event scattered white after coat 1. **tip shake the $hit out of the cans before beginning and every four or five passes **tip- watch a video or 3 on proper spraying gun or rattle can painting techniques if you need to

Well that got out of control in a hurry lol, in fact I need to copy and paste that in the "plastics finish/repair" isle! Going to link a couple pics and do that now
I use a tire shine wet look on plastic, does well for about a month
 
Monday I loaded her up with tools, lumber and went to friends house and we jack up floor near 3 termite damaged joists and scabbed new joist on side.

In exchange I received and hauled home more lumber (he bought more then we needed) so had some 2x4x8ft and 2x10x10ft resting on top of closed tailgate strapped in for ride home...

Avy is put back in the car barn and battery tender reconnected

Until another day.............. she rests
 
Well today after work I was able to get the rear shocks replaced. Was going to rotate the tires also....but the wheels are froze on there. That's going to be a project for another day along with the front shocks.

Replaced rears with Bilstein 5100's and noticed the difference already. I had one bent and leaking Stock shock on the rear and the truck has 197k miles on it....id say they were done....LOL.

Going to have to try a few techniques to see if i can get those rims off another day, so tomorrow I will hit them with Pen Oil and let them soak for a bit.
 
Last night was rear shocks, Tonight the front shocks got done. Bilstein 5100's installed all the way around now. Next step, Alignment I guess? Not sure if its needed or not after shock replacmeent but seems like a good idea. I wish I could have them do the key lift at the same time, but thats going to have to wait.
 
Back
Top