
-
If you currently own, previously owned or want to own an Avalanche, we welcome you to become a member today. Membership is FREE, register now!
You are using an out of date browser. It may not display this or other websites correctly.
You should upgrade or use an alternative browser.
You should upgrade or use an alternative browser.
What did you do to your Avalanche today?
- Thread starter Mikes-07
- Start date
Vaeagleav
PM 2022
PM 2021
PM 2020
PM 2019
PM 2018
PM 2017
PM 2016
PM 2015
PM 2014
PM 2013
SM 2006
SM 2005
Full Member
Talk to customer service at Crutchfield and they can fix you up with anything needed from head unit to speakers and all adapters to keep functions working.I have to replace the stereo in my 2003 Z71. Any recommendations on a new stereo?

Crutchfield: Car Stereo and Audio, Speakers, Home Theater, Pro Audio, TVs
Since 1974 we've provided Legendary Service to consumer electronics shoppers. Get FREE 2-day shipping, one-on-one advice, along with free lifetime tech support.
 www.crutchfield.com
Seafoam day again whahaha, Lets smoke out the neighbors. Did the wife's Toyota Venza first then the Avy . Intake spray plus 150 ml in the oil and 325 in the gas.
Also detail cleaning the Venza engine bay, badly needed and an air filter.
Oil changes for both next weekend.
Also detail cleaning the Venza engine bay, badly needed and an air filter.
Oil changes for both next weekend.
EXT4ME
PM 2024
PM 2023
PM 2022
PM 2021
PM 2020
PM 2019
PM 2018
PM 2017
PM 2016
PM 2015
PM 2014
PM 2013
PM 2012
Full Member
- Joined
- May 3, 2012
- Messages
- 6,155
Performed the 260K oil change on the 2003 Avalanche Z-66.
I try to target each even 5K on the odometer on all of my vehicles, which this time was 30% oil life remaining.
I was pleased with the small amount of oil leaking I saw from this engine while I was doing my work under the truck.
I had a few drops here and there and I don't really notice anything on the driveway where I park most of the time.
Unlike the EXT before I had the rear main seal replaced.
On that truck, I could have just saved a step and just poured a fresh bottle of oil out on the ground where the truck sat.
Anyway, six fresh quarts of Mobil 1 5W-30 and a new NAPA Platinum oil filter and I should be good in the Z-66 for a while.
")
I try to target each even 5K on the odometer on all of my vehicles, which this time was 30% oil life remaining.
I was pleased with the small amount of oil leaking I saw from this engine while I was doing my work under the truck.
I had a few drops here and there and I don't really notice anything on the driveway where I park most of the time.
Unlike the EXT before I had the rear main seal replaced.
On that truck, I could have just saved a step and just poured a fresh bottle of oil out on the ground where the truck sat.
Anyway, six fresh quarts of Mobil 1 5W-30 and a new NAPA Platinum oil filter and I should be good in the Z-66 for a while.
Changed my oil and filter too on Sunday. Funny I've got that tiny oil leak like EXT4ME . Not enough to worry about yet but it probably leaks when its warmed up. I didn't even have to top up since I've owned it. I did a Seafoam cleaning a week ago and the Avy is running great. No warning lights and idles like a clock and will giddy up when I want her to.
Next springs list:
A/C
Plugs and wires
Exhaust manifolds- has cold start ticks
Flowmaster muffler
Control arm bushings
. Not enough to worry about yet but it probably leaks when its warmed up. I didn't even have to top up since I've owned it. I did a Seafoam cleaning a week ago and the Avy is running great. No warning lights and idles like a clock and will giddy up when I want her to.Next springs list:
A/C
Plugs and wires
Exhaust manifolds- has cold start ticks
Flowmaster muffler
Control arm bushings
joendoodle
Full Member
I've had this '04, for about a week now.. finally the weather warmed and no rain:
Replaced the DDM (driver door module), with a "junkyard" one. Restored 100% functionality to the power mirrors and the Electrically adjustable pedals.
Put bright LEDs in all the interior light spots.
Investigated why only the passenger side of the tailgate latches... Discovery item, the drivers side when I manually latched it, it would not unlatch with the handle (I guess the lord was watching over me, had I got it to latch in place, investigation would have been very complicated).. Found the little plastic piece teat grabs the threads on teh linkage was broken.. Ordered a new set. wondering if it is possible to connect it w/out pulling the tailgate skin. Determined the cargo lights (bulbs) are both good, the passenger side wires are cut?? the drivers side currently has no power.
joendoodle
Full Member
I too " try to target each even 5K" for my oil changes, makes it easy to remember.. except my "03 Vette, I don't put that many miles on it, so I change the oil each fall , and let it sit w/ new oil in storage over the winter. The "good thing" about the EXT's former oil leak is the whole underbody is coated, so NO RUSTPerformed the 260K oil change on the 2003 Avalanche Z-66.
I try to target each even 5K on the odometer on all of my vehicles, which this time was 30% oil life remaining.
I was pleased with the small amount of oil leaking I saw from this engine while I was doing my work under the truck.
I had a few drops here and there and I don't really notice anything on the driveway where I park most of the time.
Unlike the EXT before I had the rear main seal replaced.
On that truck, I could have just saved a step and just poured a fresh bottle of oil out on the ground where the truck sat.
Anyway, six fresh quarts of Mobil 1 5W-30 and a new NAPA Platinum oil filter and I should be good in the Z-66 for a while.
joendoodle
Full Member
Yesterdays projects:
->put in the diode to keep low beam headlights on when on Hi beam
->investigate the (non-working) "cargo" lights, 15a fuse was blown, replaced, found a bad bulb in drivers side, replaced.. the wiring harness to the pass side had been cut by a previous owner.. who knows why.. for now 1 light is better than none.
->removed the bracket I fabricated and installed to hold the pass side window closed, and replaced the window regulator.. The old regulators cables had rusted thru, broke and became a tangled mess, allowing the window to drop a few inches.. of course this happened while it was raining and the wife was in the passenger seat.. which led to her comment "this is the most beater car you've ever bought" I know I've bought "more beater-esque" cars, but there is no victory in pointing that out.
CarMech1969
Full Member
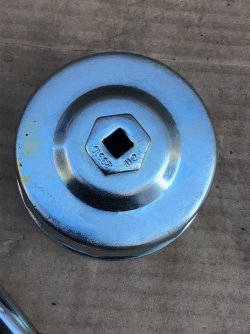
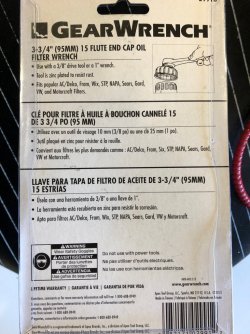
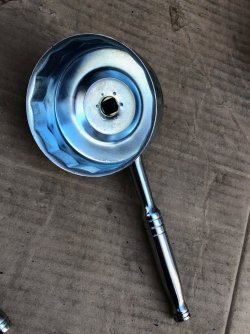
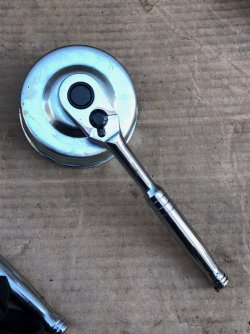
Recently did an oil and filter change on the 2500 beast, and this tool that I paid a whole $1.11 for in the surplus area of Princess Auto (Canadian version of Harbor Freight) made changing the oil filter much easier. Slips in there perfectly with just a 3/8" ratchet and nothing else.
Attachments

20streetrod06
Full Member
i have those oil filter cups in a couple different diameters. they are by far the best thing i have ever used for oil changes! Congrats on finding yours for a buck!
joendoodle
Full Member
Yesterdays projects continued:
replace the hinge pins on the 2 front doors, they both sagged and the passenger side needed to be lifted up to close, I previously adjusted the striker to make it less of a lift.. but that was only a fix until the parts (good weather and son's availability) showed up.. The passenger door went well, closes correctly, no sag.. After grinding off the old pins on the drivers door, we installed the pins for the upper hinge, now for the lower hinge.. I just discovered this kit came with 3 bottom pins and 1 top pin..
As anyone who has done this knows, once you grind off the old pins you are past the point of no return... I was able to modify a bolt to hold the hinge in place. We installed the door with only 3 of 4 pins.. It turns out , there is no sag and it closes correctly.. contacting the "supplier" to get another kit.
joendoodle
Full Member
Last night out of the blue the radio in the Avalanche died....
short story
after several hours, I fixed it.
longer story:
Fuse is good
12V on the hot all the time wire
Turns out there is no hot when in ACC / RUN wire.. I wonder what the heck turns this radio on?
time for some research:
I suspect it is the serial communication cable from the BCM (Body Control Module), or a bad ground.
more research, (I wish I remember the post, or how I found it) in 2005 a forum member posted the pinouts for the BCM, this was quite valuable to my understanding and desired troubleshooting plan.
"rung out the wire to the BCM" it is good <0.1 ohms
measured resistance on the ground, also good, <0.1 ohms
checked the "hot all the time wire" >12 VDC
These measurements were reconfirmed (later) while bending and pulling these wires to see if anything changed.
reconnected NO go
about an hour of fiddling with the connector I could get the radio to work intermittently..
I determined the pin to connectors must be "suspect" after trying several things. I finally put tie wraps on the connector to keep it under a 'downward' pressure. Radio seems to work consistently.. that said what I don't know is:
-is it the connector female receptacles(s)
-is it the pins where they are soldered into the radio (most likely in my mind)
-how will it respond when I hit one of those enormous Michigan pot holes..
And finally, since it took great effort to get the radio to work, as long as it works I am moving the "project" to replace the bulbs in the radio way down the list.
Well, it’s nice to have my new gas tank and no more “tighten fuel cap” warnings going off. After 2 tanks due to squirrels, or some other varmints, decided to armor plate the vent nipple and connector that they like to gnaw on. First, coated it all with a good coat of Mobil 1 red synthetic grease. Then, took a piece of 1.5” angle aluminum, drilled 2 sets of holes near the outer edges. Inserted zip ties through one side, ran them under the hose and connector, then back up through the other holes. Placed it on top of the nipple and connector, with about 2 inches overhanging the end of the nipple so they can’t get to it, and cinched it down with the zip ties going under the hose/connector. Shouldn’t go anywhere, won’t rust, and hopefully will be bite-proof! Sorry for the poor pic, but it’s kind hard to get in there to see.

JVZL1
PM 2024
PM 2023
PM 2022
PM 2021
PM 2020
PM 2019
PM 2018
PM 2017
PM 2016
PM 2015
PM 2014
PM 2013
PM 2012
Full Member
Got the Mechman 8206250 Alternator installed today with the wire upgrade.
Had some problems Thursday, 15 volts on my meter and the Avy's gauge. With
the Battery above the gauge that lights up, going on and off with a no charge on the display.
Called Mechman, he asked if I had in stalled the wire harness that came with the
alternator. I guess it pays to read all the instructions. The harness and instructions
were bubble rapped separate. I glanced at the sheet and caught that it was an
extension for clocking the alternator. Well the other side was for using the harness
and connecting a yellow wire to a 12v ignition source.
Well today seems to have it.
Last edited:
MS03 2500
PM 2017
PM 2015
SM 2014
PM 2013
PM 2012
SM 2011
SM 2010
SM 2009
SM 2008
SM 2007
SM 2006
Full Member
Got the Mechman 8206250 Alternator installed today with the wire upgrade.
Had some problems Thursday, 15 volts on my meter and the Avy's gauge. With
the Battery above the gauge that lights up, going on and off with a no charge on the display.
Called Mechman, he asked if I had in stalled the wire harness that came with the
alternator. I guess it pays to read all the insertions. The harness and instructions
were bubble rapped separate. I glanced at the sheet and caught that it was an
extension for clocking the alternator. Well the other side was for using the harness
and connecting a yellow wire to a 12v ignition source.
Well today seems to have it.

joendoodle
Full Member
From my Nov 7th post:
Investigated why only the passenger side of the tailgate latches... Discovery item, the drivers side when I manually latched it, it would not unlatch with the handle (I guess the Lord was watching over me, had I got it to latch in place, investigation would have been very complicated).. Found the little plastic piece that grabs the threads on the linkage was broken.. Ordered a new set. wondering if it is possible to connect it w/out pulling the tailgate skin.
After being out of town for over a week, I have the parts, and the desire to go for it.
Determined I could not install the linkage and hook up the clip(s) w/o pulling the tailgate skin (maybe other people can, but for me the skin needed to come off).
I assume this is the way it came from the factory, the skin is held on with 6 rivets across the top and 7 on the bottom.
Normally to remove rivets I drill thru them.. since this is a "composite" (plastic-esque) substructure, drilling only made the rivets spin.. so out comes the chisel to lop of the heads.. This worked quite well.
 This picture shows the tailgate installed w/o the skin; 2 thing's to note:
1) gives a real mean look to the back of teh Avalanche.
2) would have been a great idea 1st.. I had it all together and working, installed the tail gate and the "new plastic" clip released. So (for me) to have room to work off comes the skin again
 Hopefully you can see how I modified the OEM clips, I put a nut on the end to keep the rod from pulling thru and added a tie wrap to help hold the clip latched.

Recall the original problem was the drivers side (tailgate) did not latch, After fixing the "unlatching mechanism", an adjustment to the striker bolt made it all work fine.
Multiple skin removal and re-pop-riveting it on, made me think, If I'm doing this again, I'm getting a pneumatic riveter.. this was work for this old man.
Investigated why only the passenger side of the tailgate latches... Discovery item, the drivers side when I manually latched it, it would not unlatch with the handle (I guess the Lord was watching over me, had I got it to latch in place, investigation would have been very complicated).. Found the little plastic piece that grabs the threads on the linkage was broken.. Ordered a new set. wondering if it is possible to connect it w/out pulling the tailgate skin.
After being out of town for over a week, I have the parts, and the desire to go for it.
Determined I could not install the linkage and hook up the clip(s) w/o pulling the tailgate skin (maybe other people can, but for me the skin needed to come off).
I assume this is the way it came from the factory, the skin is held on with 6 rivets across the top and 7 on the bottom.
Normally to remove rivets I drill thru them.. since this is a "composite" (plastic-esque) substructure, drilling only made the rivets spin.. so out comes the chisel to lop of the heads.. This worked quite well.
This picture shows the tailgate installed w/o the skin; 2 thing's to note:1) gives a real mean look to the back of teh Avalanche.
2) would have been a great idea 1st.. I had it all together and working, installed the tail gate and the "new plastic" clip released. So (for me) to have room to work off comes the skin again
Hopefully you can see how I modified the OEM clips, I put a nut on the end to keep the rod from pulling thru and added a tie wrap to help hold the clip latched.Recall the original problem was the drivers side (tailgate) did not latch, After fixing the "unlatching mechanism", an adjustment to the striker bolt made it all work fine.
Multiple skin removal and re-pop-riveting it on, made me think, If I'm doing this again, I'm getting a pneumatic riveter.. this was work for this old man.
Last edited:
EXT4ME
PM 2024
PM 2023
PM 2022
PM 2021
PM 2020
PM 2019
PM 2018
PM 2017
PM 2016
PM 2015
PM 2014
PM 2013
PM 2012
Full Member
- Joined
- May 3, 2012
- Messages
- 6,155
I started one of those back burner projects that I've been meaning to do for a long time now.
I decided it was time to clean up and reseal the rubber seals on the bed panels.
I've only cleaned up the seal and panel for the number one panel, so far.
This is not a hard job, at all.
But getting all of the old, useless sealant completely cleaned off is a rather tedious process.
The rubber seal pulled off of the panel easily enough and should go back in place with no problem.
The rubber seal itself appears to be in good shape and looks to be very durable.
The old sealant has long since perished and it is down inside a couple of hidden channel flaps on the rubber seal.
It took a bit of doing to scrape and dig all of that stuff off.
Most of the old sealant was dried up, crumbling and useless, but it was still a chore.
It is no surprise at all that the bed panels leaked after seeing the state of the sealant.
I'll be using 3M Black Super Weatherstrip Adhesive for my new sealant.
I think I will just clean and reseal one panel at a time and just stack them all in the garage until they are all finished and ready to go back on the truck.
That's all I need to have one or two panels mounted and some bubba decide to reach in and take one.
I can wait.
Bluonyx
Full Member
ygmn
This is a Custom Title
Staff Member
Administrator
Moderator
Charter Member
PM 2024
PM 2023
PM 2022
PM 2021
PM 2020
PM 2019
PM 2018
PM 2017
PM 2016
PM 2015
PM 2014
PM 2013
PM 2012
SM 2011
SM 2010
SM 2009
SM 2008
SM 2007
SM 2006
SM 2005
SM 2004
SM 2003
Full Member
Was going yo pick up tile flooring - 2 pallets worth until I did the math onthe weight.... 3000 lbs. and the drive would have been 50miles on interstate.
so nahhhhhhhhh
Deliver it please. and use our fork lift when you unload please.
Over all great decision on my part
so nahhhhhhhhh
Deliver it please. and use our fork lift when you unload please.
Over all great decision on my part
Wow. I have never heard of clay barring. So I looked it up and watched a how to video.
Thanks Bluonyx
I'm wondering if I need to buy a clay bar kit or can I cheap out and use regular kids clay and dish soap?
Thanks Bluonyx
I'm wondering if I need to buy a clay bar kit or can I cheap out and use regular kids clay and dish soap?
Last edited:
EXT4ME
PM 2024
PM 2023
PM 2022
PM 2021
PM 2020
PM 2019
PM 2018
PM 2017
PM 2016
PM 2015
PM 2014
PM 2013
PM 2012
Full Member
- Joined
- May 3, 2012
- Messages
- 6,155
Wow. I have never heard of clay barring. So I looked it up and watched a how to video.
Thanks Bluonyx
I'm wondering if I need to buy a clay bar kit or can I cheap out and use regular kids clay and dish soap?
I clay bar all of my vehicles.
I use Meguiar’s Smooth Surface Clay Kit.
It's not very expensive and I pick mine up at Walmart.
I do mine once a year or so.
It's the first step before any paint correction or waxing and such.
Makes a huge difference.
It makes the painted surface smooth as glass.

old skool
Full Member
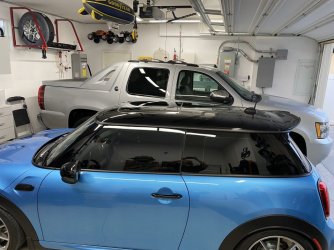
Looks like your garage is like mine...have to back in to get it to fit...once backed in, maybe 2" clearance in back, and 2" in front.Detailed the interior, and started to clay bar but arms got tired. Then had to rearrange the garage to get her to fit, but it worked. I'll finish the clay barring and engine detailing tomorrow.
Bluonyx
Full Member
Yup, probably about 4" front 4" in the back before wall.Looks like your garage is like mine...have to back in to get it to fit...once backed in, maybe 2" clearance in back, and 2" in front.
Got a call from the dealer asking if I could bring the AV back cause they forgot to do a proper inspection and smog on it. So I said ok, but it's a little inconvenient. I told them don't worry about the TPMS light cause my old wheel setup wasn't compatible with this one's system. I was going to get it fixed this weekend and pony up the extra cash. So I pick it up, and the dealer went ahead and detailed it again and also replaced the all the TPMS Sensors in my old wheels for me for FREE. They definitely went our of their way to make me happy, rare to see a dealer like that out here in SoCal.
2003VAAV
Full Member
FYI, from my experience, a well soaked rag with mineral spirits dissolves that old "caulking" sealant fast (once the big chunks are removed). Also, I recommend wiping the seals with dielectric (silicon) grease after they are attached and dry.I started one of those back burner projects that I've been meaning to do for a long time now.
I decided it was time to clean up and reseal the rubber seals on the bed panels.
I've only cleaned up the seal and panel for the number one panel, so far.
This is not a hard job, at all.
But getting all of the old, useless sealant completely cleaned off is a rather tedious process.
The rubber seal pulled off of the panel easily enough and should go back in place with no problem.
The rubber seal itself appears to be in good shape and looks to be very durable.
The old sealant has long since perished and it is down inside a couple of hidden channel flaps on the rubber seal.
It took a bit of doing to scrape and dig all of that stuff off.
Most of the old sealant was dried up, crumbling and useless, but it was still a chore.
It is no surprise at all that the bed panels leaked after seeing the state of the sealant.
I'll be using 3M Black Super Weatherstrip Adhesive for my new sealant.
I think I will just clean and reseal one panel at a time and just stack them all in the garage until they are all finished and ready to go back on the truck.
That's all I need to have one or two panels mounted and some bubba decide to reach in and take one.
I can wait.