tpacissp said:I registered just to say thank you to Keith for his write up on the D1 diode as a possible fix. I tried it yesterday on our 2013 BD LTZ and it worked like a charm saving us hundreds$.
 tpacissp
Stick around.
tpacissp said:I registered just to say thank you to Keith for his write up on the D1 diode as a possible fix. I tried it yesterday on our 2013 BD LTZ and it worked like a charm saving us hundreds$.
tpacissp I removed the old diode from the front of the circuit board and the one I added the first time in the back.
 out of the lamp case but hopefully it is a 4002 diode which I replaced.
how do you view these pictures?In hopes of helping those who have this problem with their 3rd brake lights I present the story of my light.
I have a 2013 Avalanche that I bought in Feb of 2016. I never bothered to check to see if the 3rd light worked when I bought it, because who does that? Anyways, I notice about 6 months back that it wasn't working, and I'm not sure if it worked when I bought the truck. This weekend I decided to fix it. Shouldn't be a big deal.
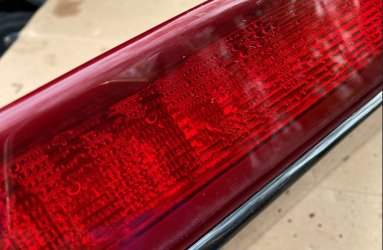
I had noticed before that it looked like it had some moisture on the lens. When I took it off the truck and popped off the rubber gasket that hold the wiring harness it dropped about a pint of water directly on my pants. Not a great start. I then got to work diagnosing why the LED assembly didn't work. Since I couldn't see the whole circuit board from the ~2" hole that the wiring harness goes through I decided to open the light up. Not as easy as I had hoped. I now understand where the water may be coming from. The seam between the lens and the backer seems to be sealed with a VHB double sided tape and the top side was very poorly sealed in a couple spots. The bottom was sealed much better which made sure the water didn't escape. I got the top disassembled but the bottom was stuck so well that in the end I ended up cracking the lens the whole width of the assembly. Do not try this, it won't turn out well.
After getting the circuit boards out I was able to check the components and test the board. Looking at the circuit board I do not believe the water has anything to do with the LEDs functionality. I did not see any evidence of corrosion and the board only has the LEDs, resistors, and a couple of diodes on it. Not really much to break. So what is the problem?
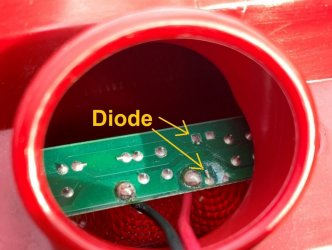
I can only speak as to my light assembly but the problem here was the diode labeled D1.
This diode showed about an 8.5v drop across it which left little voltage to actually light the LEDs. The only function of the diodes here seem to be as a reverse polarity protection. Since I had the board out I pulled out D1 and replaced it with a 1N4002 that I had in my parts box. I tested it out and I had a good LED strip again. A bit of glue and sticky fingers and the light assembly is back in service.
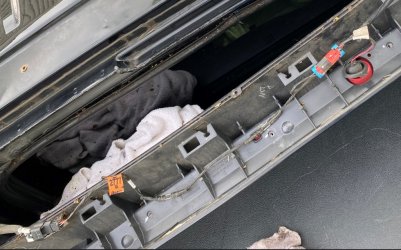
But what if you don't want to bust up your 3rd light to get into it? Well, D1 is accessible from the hole that the wiring harness goes through. Soldering a new diode (1N4001 or equivalent) to the back side of the circuit board (no real need to remove the faulty D1) should result in a working light assembly. Here is the spot you would put it:
Before:
After:
My guess is that the manufacturer got a bad batch of diodes and some of them are not lasting long. Hopefully this will save some lights out there.
just fixed my 2013 avalanche with the diode. thanks for the info. just wondering if the diode has to be installed in the right directionIn hopes of helping those who have this problem with their 3rd brake lights I present the story of my light.
I have a 2013 Avalanche that I bought in Feb of 2016. I never bothered to check to see if the 3rd light worked when I bought it, because who does that? Anyways, I notice about 6 months back that it wasn't working, and I'm not sure if it worked when I bought the truck. This weekend I decided to fix it. Shouldn't be a big deal.
I had noticed before that it looked like it had some moisture on the lens. When I took it off the truck and popped off the rubber gasket that hold the wiring harness it dropped about a pint of water directly on my pants. Not a great start. I then got to work diagnosing why the LED assembly didn't work. Since I couldn't see the whole circuit board from the ~2" hole that the wiring harness goes through I decided to open the light up. Not as easy as I had hoped. I now understand where the water may be coming from. The seam between the lens and the backer seems to be sealed with a VHB double sided tape and the top side was very poorly sealed in a couple spots. The bottom was sealed much better which made sure the water didn't escape. I got the top disassembled but the bottom was stuck so well that in the end I ended up cracking the lens the whole width of the assembly. Do not try this, it won't turn out well.
After getting the circuit boards out I was able to check the components and test the board. Looking at the circuit board I do not believe the water has anything to do with the LEDs functionality. I did not see any evidence of corrosion and the board only has the LEDs, resistors, and a couple of diodes on it. Not really much to break. So what is the problem?
I can only speak as to my light assembly but the problem here was the diode labeled D1.
This diode showed about an 8.5v drop across it which left little voltage to actually light the LEDs. The only function of the diodes here seem to be as a reverse polarity protection. Since I had the board out I pulled out D1 and replaced it with a 1N4002 that I had in my parts box. I tested it out and I had a good LED strip again. A bit of glue and sticky fingers and the light assembly is back in service.
But what if you don't want to bust up your 3rd light to get into it? Well, D1 is accessible from the hole that the wiring harness goes through. Soldering a new diode (1N4001 or equivalent) to the back side of the circuit board (no real need to remove the faulty D1) should result in a working light assembly. Here is the spot you would put it:
Before:
After:
My guess is that the manufacturer got a bad batch of diodes and some of them are not lasting long. Hopefully this will save some lights out there.
Hey Alacey ~ first, let me say WOW on the AWESOME write-up on a possible fix for that expensive-to-replace 3rd light! You obviously posses electrical troubleshooting skills that the uninitiated only dream to have! BUT, that being said, you make it simple for the electrical layman to carry out the possible fix. QUESTION: How can I TEST that diode myself to see if it's bad before spending the time on replacing it if it's not the culprit? I have a meter but what is the testing process and what am I looking for? Did you test it under power which is how you determined the voltage drop? Also, seeing 8.5v drop, I'm assuming that thing is 12v LED's? Anyway, thanks again for the awesome write up and got a kick out of the somewhat sarcastic humor re water being unable to get out but got in fine through the top! Mine's the same ;-/just fixed my 2013 avalanche with the diode. thanks for the info. just wondering if the diode has to be installed in the right direction