• If you currently own, previously owned or want to own an Avalanche, we welcome you to become a member today. Membership is FREE, register now!

Electrical Question

corvettejoe

SM 2003
Full Member
Joined
Oct 24, 2002
Messages
1,103
Hi All,


Well here is my question/problem. ;D I ran a power lead off my battery for my fog lights that I added and it is not switched. So dummy me left the lights on, :p but the woman cough it before it was to late. ;D It was OK and it did not kill the battery. Now I have 2 questions.

One ? What is a switched terminal in the fuse box under the hood that I can use to power my light that will not interfere with my factory wiring etc. I ran all separate wirers under the hood to avoid warrantee issues. I have one master pwr lead that ties into a buss that feeds everything else. I want to make this master pwr lead switched so I will not come out to the dreaded dead battery. :C: How embarrassing. :7:

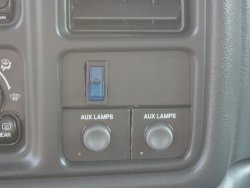
Second ? I bought the GM switches that go in the pockets under the on-star and there is 6 pins on them. The dlr could not tell me the pin outs for them. I did find power and ground. :D The pin to the top left is pwr, the pin to the bottom right is grnd. There is a light on these and I am not able to figure out what pin makes the light light. The GM PN is 15722980

Thanx for the help

CJ :B:
 
Hey CJ,
1. Is the switch you bought a AUX lamps switch or the same momentary push fog switch that is under the cargo switch?
2. There are 2 metal posts under the the main fuse box in the engine compartment. Take off the cover, then lift the main platform, you will see 2 posts, one on the side towards the firewall, the other towards the battery. One post is constant hot, the other is ignition hot. Find the ignition hot, run a wire from it through the firewall.

If you have the Aux lamp switch I mentioned before, JP Customs has the clips for it, as well as directions and clips that will allow you to plug directly into the MBEC box above the parking brake . No splicing or cutting, plugs in like factory.
 
The switch says AUX on it. It is not a momentary one but a firm on/off one. I liked it because it matches the dash and did not want some hokey aftmkt switch on my dash visable. The other problem is that I had to purchase 2 left swiches and flip one upside down so i have some upside down ?writing on it but I will figure that out in time.

It is the switch they use for the cablights on the other trucks. AV does not come with cab lights. Wish it did I think they are cool.

I wil check at JP customs thanx. Can you get me a PN for the connector? I was unable to find anything at JP customs.

CJ ?:B: ?;D
 
do a search on aux switch, trust me we have been here before and the info exists . . .

I can't help but point you to Jason of JPCustom's Pendlum's Z71 personal page that has a link, at the bottom, to a document that contains wiring info for your aux switch. (clarifying edit: that would be the "rear fog lights" linked document)

but as is always the case, just having the switch alone won't help you (unless you love to solder) because you need the female plug approriate for the switch too . . . .
 
Jackalanche is correct. (y)
Email Jason telling him what you are doing, and he will know what to get for you. Tell him you need the clips for the switch, and for the wires coming from the switch to the MBEC under the dash.
 
corvettejoe said:
The switch says AUX on it. It is not a momentary one but a firm on/off one. I liked it because it matches the dash and did not want some hokey aftmkt switch on my dash visable. The other problem is that I had to purchase 2 left swiches and flip one upside down so i have some upside down ?writing on it but I will figure that out in time.

CJ ?:B: ?;D

I've attached a pic of how I tackled the two left switches. I'm sure if you took better care in doing it than I did the results will be much better. I rushed through the process. All you need to do is take a dremel and grind down one side of the plastic. As far as the wiring goes do like everyone says and try jason. Good Luck.
 

Attachments

  • switch.JPG
    switch.JPG
    88.4 KB · Views: 62
THanx for the picture.

Hey what was th epart # for the switch on the right? GM said there was not one available it was for export only. I had to purchase 2 left side switches and flip it upside down for it to fit.

Do you have the wiring for it that really wat i need. I check the archives but no pinouts on the switch.

CJ :B:
 
rockslide said:
I've attached a pic of how I tackled the two left switches. I'm sure if you took better care in doing it than I did the results will be much better. I rushed through the process. All you need to do is take a dremel and grind down one side of the plastic. As far as the wiring goes do like everyone says and try jason. Good Luck.
Nice job, are you taking orders ;D

Some of use not too facile with a dremel :C:
 
corvettejoe said:
THanx for the picture.

Hey what was th epart # for the switch on the right? GM said there was not one available it was for export only. I had to purchase 2 left side switches and flip it upside down for it to fit.

Do you have the wiring for it that really wat i need. I check the archives but no pinouts on the switch.

CJ ?:B:

???they are both left side switches. I took mine out of the Av (It's going back under lemon law, but that's another story) and they are sitting in a box. I don't remember what thread I found the wiring under. I'll see if I can find it for you.

gandolphxx... Sorry I'm not taking orders at this time ;D
But it really is easy to do. just place the switch into the holder as far as you can and mark the top and the bottom of the switch where they overlap. Draw a line from mark to mark and take a liitle off and see if it fits. Still to big, file a little more until you get it >:D
 
Well JP has not responded to me yet :( and I cannot find the doc for the switch. I guess I will have to take a meeter to it this weekend and see what I can find out. I

Is there thread on how to remove the back bumper I want to incorporate a pair of fog light into it for backing up. I have them mounted now down my the hitch but not a really good place for them. I will have to do a search to see what others have done. I have an aftermkt backup system too and might try to make them look a bit more factory. I will try to get some pictures once I figure out how to put them up on a posting. :p


:B: CJ

 
CJ, aside from sending you the doc myself I really can't help you any further than linking you to his page, telling you the name of the document, and crossing my fingers. ;D You can do it, try it one last time. The info is valuable.

I am not sure that Jason is in the business of selling the female plugs for the aux lamps switch, but he is worth a try. He is no doubt on his way to Vegas / SEMA soon, so he may be slow in getting back to you.

The right side aux switch part number does exist. And GMPartsDirect will sell you anything, export or not, as long as you have the part #. The four switch pod that some of us swapped our cubbies for is export, btw.
 
Thanx Jackalanche,

Do you have the part number that is part of the problem I am running into I cannot seem to find th epart number to call GM with.


I ende dup getting 2 left sided one and flipping it around. For now it will do but I would like to get the right one.

I am jellous JP goes to SEMA. Wish I could. ;D

I liked the pictures of your tuck. I want to put backup lights in but in the bumper not up high.

 
Hey guys, here is a link to the instructions I have on my personal website.

Rear Fog Light Instructions

In the instructions it shows where to hook the switch up to the appropriate pins on the MBEC (black box between the brake and the E-brake pedals).
Here is what each pin does on the Aux Lamps switch.

A = Not Used
B = Ground
C = Power Out
D = Power for the LED light on the Switch
E = Back lighting for the words on the switch (will come on with the park lights)
F = Main Power in

Be sure to use a relay for hooking up anything to the switch. The switch really isn't designed to handle all the power going through it, that's what the relay it for. If you don't, you'll eventually fry the switch and possibly start a nice little fire. (y)

Now, for those wanting to hook up some lights and aren't really familiar with relays, here's how to hook up the relay using the switch.

These are the numbers on a standard Automotive relay
30 = 12V Power (You can use the same source to hook up F on the switch as well as 30 on the relay)
85 = Wire coming from C on the switch
86 = Ground
87 = Lights or whatever you're wanting to power with the switch
87a = Nothing

To make it really clean and "factory" use the connector numbers in the instructions. You can request a free sample by searching the number on www.powerandsignal.com]Power and Signal[/url]www.powerandsignal.com
I buy a bunch of different connectors and terminals, but the free sample is the best way to get stuff to "check out" before you buy it. In your case, since you're only doing one or two, the free sample can save you a lot of money, plus you can make your own custom wire harness.

I like using the MBEC because it makes for a nice clean place to find the connections. Plus it minimizes the amount of wires you have to run through the fire wall.

Hope this helps.
 
OK Well I tried to use the terminal on the back side of the box uinder the cover and it is still live even after 20 MIN of waiting. Any other thoughs, THis is true if the one on the front side too. None of them seem to lose power and my light stay on. :-[ :7:

Fustrated big time.... ???
 
Back
Top