• If you currently own, previously owned or want to own an Avalanche, we welcome you to become a member today. Membership is FREE, register now!

HID's finally ordered...PICS ADDED!

gadgetmason

Full Member
Joined
Dec 2, 2006
Messages
342
Location
Leicester, MA
I finally ordered my HID's from the member who is giving the $139 per set deal.
Getting the Lows and Fogs. Said they should be in by Monday latest... Keeping my fingers crossed... I'm one of those that 'has to have it now'.? >:D

Should really help to 'light up the night'. I think beyond that, I may just pick up the sail panel windows and be done for awhile...? :E: Enought $'s out the door for the moment!
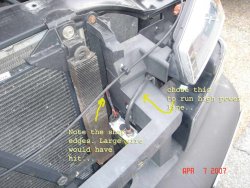
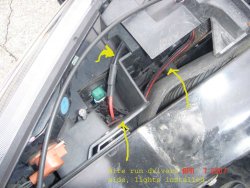
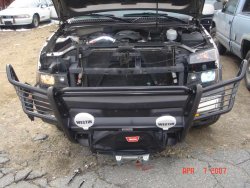
Pics added below!
 
Congrats on the HID's! You might just find yourself taking a drive at night for no reason...  :cool:    I love mine.  :love:
 
Let us know how you like them! And let's see some before/after pics!

What temperature did you get?
 
I think he's talking about this:

http://www.chevyavalanchefanclub.com/cafcna/index.php/topic,78646.0.html
 
Thanks..... I found it by looking through ALL of Wayne's posts...... jeez, and I thought I had a lot to say about nothing!  :beating:

I'll hold off until there's more feed back on those. If I can't wait and get the urge to spend my money before then, I'll go with a site sponsor (or at least used to be).... I haven't had much time to spend on the boards.
 
vertabatt said:
Let us know how you like them! And let's see some before/after pics!

What temperature did you get?

Picked up the 6000K's. Wanted 65s but he didn't stock those and there wasn't much difference between the two temps.

Can't wait! :needhug:
 
BAT said:
Thanks..... I found it by looking through ALL of Wayne's posts...... jeez, and I thought I had a lot to say about nothing!? :beating:

I'll hold off until there's more feed back on those. If I can't wait and get the urge to spend my money before then, I'll go with a site sponsor (or at least used to be).... I haven't had much time to spend on the boards.

Hey!

Stop working so hard a play a little!

Sent a PM with the info...

W.
 
Raceman said:
An what ones did you get?

www.xenonrider.com

You have to call and mention that you are CAFCNA member to get the great price. I ordered yesterday, said they were going out same day and should see them by tomorrow or Monday, latest. I'll keep everyone posted on the expediancy issue. I'll also do a before and after as well as installation notes. Ease, quality etc.

Wayne
 
gadgetmason said:
www.xenonrider.com

You have to call and mention that you are CAFCNA member to get the great price. I ordered yesterday, said they were going out same day and should see them by tomorrow or Monday, latest. I'll keep everyone posted on the expediancy issue. I'll also do a before and after as well as installation notes. Ease, quality etc.

Wayne

Sweet

Thanks  (y)
 
Congrats Mason :wave:  I have a set too. almost 3 months later,still working fine. Woot!
 
So here we go... I've taken the pics in order of how things happened.. As time permits, I'll annotate.? >:D

These pictures denote the removal of the front grille. Note where all the clips are... and yes, I busted ONE. :E: Fool plastic.. This one does not really affect the holding power but I'll eventually replace this. Probably when I get one more set of HID's for the high beems. Once you see the final product, I just can't stop at 2 sets!

>:D

Note, all pictures are 1024x768 to show more detial. Just click on the file name...

The bottom two in this set show the removal of the turn signal/running light. There is a clip that my finger is pointing to. Once that is released, the light will come out in your hand.
 

Attachments

  • 1ol.jpg
    1ol.jpg
    76.7 KB · Views: 189
  • 2ol.jpg
    2ol.jpg
    79.5 KB · Views: 186
  • 3ol.jpg
    3ol.jpg
    57.5 KB · Views: 185
  • 4ol.jpg
    4ol.jpg
    60.6 KB · Views: 185
More...

This set shows the winch/bushguard forward so I could access the grille, also shows the drivers side turn/parking light out and the next two show how to remove the pins that hold the headlights in. There are two, one on each side. just slide a flat head screwdriver in and pri out then lift straight up and the light will come out in your hand. Pretty ingeneous.  :cool:
 

Attachments

  • 5ol.jpg
    5ol.jpg
    98.2 KB · Views: 186
  • 6ol.jpg
    6ol.jpg
    90.8 KB · Views: 184
  • 7ol.jpg
    7ol.jpg
    69.6 KB · Views: 182
And more...

These next three show the continued removal of the headlights and the initial placement of the passenger side coil. The use of self tapping screws and the dewalt made this a breeze for both driver and passenger sides.  >:D
 

Attachments

  • 8ol.jpg
    8ol.jpg
    78.6 KB · Views: 183
  • 8aol.jpg
    8aol.jpg
    95.7 KB · Views: 184
  • 9ol.jpg
    9ol.jpg
    98.4 KB · Views: 183
Yet still more...

Note in these pictures, I show the routing of wires I chose. The highpower or thick wire I ran over the top as shows as if I followed the path I sent the other wire, it would rub on the sharp metal of the cooler. The smaller wire when connected stayed against the plastic and would not rub. This route for the smaller wire also gave enought play to work on the other side as shown.
 

Attachments

  • 10ol.jpg
    10ol.jpg
    94 KB · Views: 183
  • 11ol.jpg
    11ol.jpg
    97.2 KB · Views: 182
  • 12ol.jpg
    12ol.jpg
    92.2 KB · Views: 182
Yes, still more...

This set shows the run of the passenger side wireing that worked best. Note both sets of wires followed the same path and worked quite well.

The last picture in this set shows the difference between the HID on the right and stock on the left. Fogs are off.
 

Attachments

  • 13ol.jpg
    13ol.jpg
    96 KB · Views: 179
  • 14ol.jpg
    14ol.jpg
    94.3 KB · Views: 180
  • 15ol.jpg
    15ol.jpg
    97.8 KB · Views: 179
Back
Top