• If you currently own, previously owned or want to own an Avalanche, we welcome you to become a member today. Membership is FREE, register now!

midgate disassembly

lanman1

SM 2003
Full Member
Joined
Apr 16, 2002
Messages
554
Location
Upstate SC
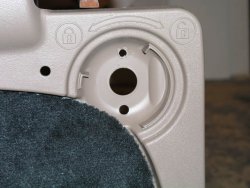
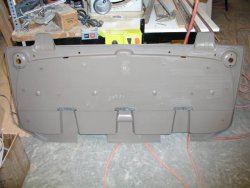
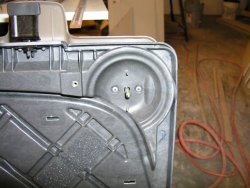
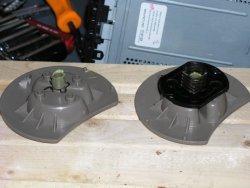
I am trying to take the interior skin off the midgate and all is loose except I can't seem to get the 2 turning latches that secure the rear window in place apart. There is a hole on the side of the midgate under the interior trim that looks like there may be some sort of a key but no luck with a screwdriver. :E: Help!
 
I suggest that you send msdinsp a PM, he has done the split midgate mod and I would imagine that he would be the best (most qualified) person to answer your question

Here is a link to the thread with his great split midgate mod.


http://www.chevyavalanchefanclub.com/cafcna/index.php?board=16;action=display;threadid=16443
 
Thanks Skidd, I did look at that thread however doesn't look like he removed the interior skin. Oh well, maybe I'll just take the crowbar to it. >:D Thanks again for the reply. (y)
 
You might want to talk to kodiakz, hes taken apart a couple midgates to make some custom subwoofer boxes as well. Good luck
 
lanman1 said:
Oh well, maybe I'll just take the crowbar to it. >:D

LOL... you know what they say, if it breaks then it probably needed fixing anyway. Let us know what the 'sticky' bit was, it'll be good to have the answer on here for future reference. (y)
 
I did the split in the midgate, sorry, I just cut it, didn't actually take it apart, but do let us know what you find
 
Got it figured out. I really becomes obvious once the midgate is removed from the vehicle. There is a clip much like that ones that hold on non power window cranks on each latch. Once the round latches are removed there is one last clip under each one and that's it, the door skin comes right off.
 
lanman1 said:
I took some pics at my camera's lowest setting and they're still in the 150-180kb range.

Mate, if you load them into some photo software like Adobe Photoshop or similar then you can reduce the size of the. or if you email them to me I'll reduce them for you and post them. (y)

Skidd
 
Thanks, I have Photoshop, is there a way to batch resize them? If not, I may take you up on your offer.
 
The latch itself, both with and without the tensioning spring and pressure plate. Notice the clip on the shaft of the one on the left. Use a cotter pin extractor or pait of needlenose to get this off and the whole assembly will come right off.
 

Attachments

  • latch_back.jpg
    latch_back.jpg
    57.4 KB · Views: 208
Thanks for the pictures Lanman 1,

Not everyone will use this info, but it is good to have here and the pictures and your explanation are a great addition to the collective database of info in this forum.

Thanks again.
Steve
 
Nice pics, lanman1.

But please do share with us, why are you taking apart the midgate?

-- SS
 
Lemme see how it turns out first.... I will tell you it is audio related but if it turns out bad, I might not want anyone to know. :-X
 
lanman1 said:
Lemme see how it turns out first.... I will tell you it is audio related but if it turns out bad, I might not want anyone to know. :-X

Mate... they are great pics and thanks for posting them. While the project remains 'Top Secret' keep the pics happening. It's all the great members who contribute such fantastic info as yours who make this site the terrific resource it is.

Well done. (y)
 
Hey lanman1, looks like a lot of work to me. I just removed the 4 nuts on the bottom hinge and took the whole thing out. It sets in my basement now until it's time to trade the truck in. Oh, and I can speak for having the midgate removed with a 1500 watt RF SoloBaric sub in back. The bass is incredible! Check out my link below to some pics of it. I can post more if anyone else is intersted. The only thing I've found that is troublesome is getting the 'swing bar' out now. That's the bar that either stays on the midgate when you have the window out or stays put with the window in. It's a heavy sucka so be ready when it releases! :p
 
Thanks guys, I took some when I put in my door speakers but they came out blurry. I was afraid everyone would rag on my pic taking abilities ;D

Maybe I'll go ahead and post them
 
Lanman1:  Thanks a grip for the pics!  I had looked at the site several times before and hadn't seen anything.  I was really banging my head trying to separate the last corner  :E: !!!  I have dissasembly pics of the front and rear doors that I will be posting soon.  Right now I'm focused on getting my midgate box finished. 

Thanks Again!!!!!!!!!!

-AE
 
I am doing the same thing with my Midgate and these pictures helped drastically. I have mine all pulled apart except these two dials so this will help me pull apart the dials and get the rest of the skin off.

It looks like the rear is glued on or otherwise much better attached. Has anyone tried to get off the backside of this?
I may try to make a test hole in the rear to see what it looks like. I am using a junkyard midgate I am disassembling to check how it all works out that I will be using for my speaker box. I wanted to peel off the rear and make a new box but wanted to know if anyone has tried to do anything with the rear?

Thanks!
 
Back
Top