• If you currently own, previously owned or want to own an Avalanche, we welcome you to become a member today. Membership is FREE, register now!

Removable Fiberglass Sub Box - DONE!

s_giacomo

Full Member
Joined
Aug 7, 2002
Messages
240
Location
Sooner Nation
Started this thread but can't figure out how to change the subject :E:, so started a new one...
http://www.chevyavalanchefanclub.com/cafcna/index.php?board=20;action=display;threadid=21615

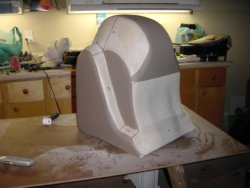
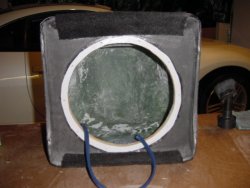
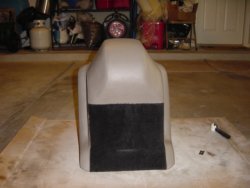
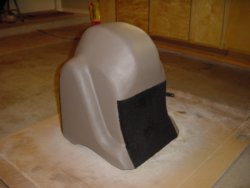
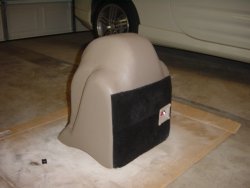
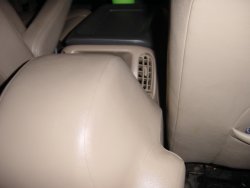
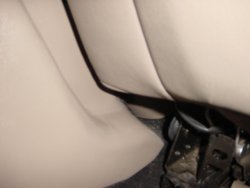
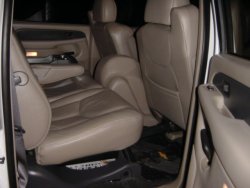
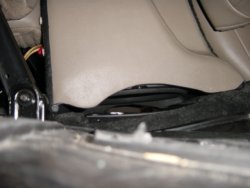
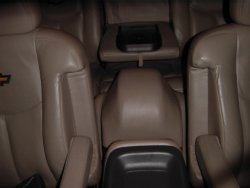
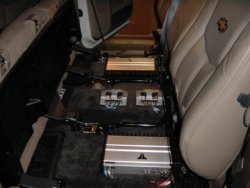
Here are some pics, the box is 3/4" thick: 7 layers of fiberglass chopped mat, then interior coated with long strand fiberglass filler mixed with resin (THANKS AlliedPerformance (y)). Baffle is 3/4" MDF and holds on to an a$$ pounding downfiring JL12W6. I put hours and hours and hours into this thing. Now I know why my local stereo shop quoted me $900 for a similar but more simple contoured custom fiberglass box (and that was without the JL sub). Covered with matching vinyl (royal pain in rump just like DS said it would be, but I tried the SEM texture and it just wasn't tough enough for a removable box IMHO). I'm thrilled with the results and had a blast taking this on, but then spent more money and decided to upgrade my front speakers from Kicker K652 components to Diamond Hex s600s. Not a lot of difference there but there is some...

Any way, tell me what you guys think... pretty much same deal as the MDF box I posted earlier. The box has quick disconnects and slides out the side behind the passenger seat for midgate use.
 

Attachments

  • sgiacomo_fiberglass_sub_box_interior.JPG
    sgiacomo_fiberglass_sub_box_interior.JPG
    61 KB · Views: 101
And the seats can be moved 100% back and reclined with no contact (by about 1/4")!
 

Attachments

  • sgiacomo_fg_box_bottom_fit_to_seat.JPG
    sgiacomo_fg_box_bottom_fit_to_seat.JPG
    60.7 KB · Views: 95
Side cutouts for air movement, viewed from rear floor...
 

Attachments

  • sgiacomo_fg_box_side_view_from_AV_floor.JPG
    sgiacomo_fg_box_side_view_from_AV_floor.JPG
    57.3 KB · Views: 96
Front view in the AV, basically taken from the rear view mirror (took about 10 tries to get a decent pic)!
 

Attachments

  • sgiacomo_fg_sub_box_front_in_AV_front.JPG
    sgiacomo_fg_sub_box_front_in_AV_front.JPG
    58.1 KB · Views: 94
JL 300/2, JL 500/1, 1 FD Cap, Diamond Hex Xovers Mounted under rear seat (no interference w/midgate)...
 

Attachments

  • sgiacomo_under_rear_seat_clean_install.JPG
    sgiacomo_under_rear_seat_clean_install.JPG
    59.7 KB · Views: 92
Cross section of the sub box from where I cut out the hole for the quick disconnect terminals...
 

Attachments

  • sgiacom_fg_sub_box_cross_section.JPG
    sgiacom_fg_sub_box_cross_section.JPG
    57.4 KB · Views: 95
OK, guess I'm done now. Would probably be easier to set up a web site but just haven't taken the time. BTW - I will be selling my kicker K652 Components and maybe the sub box I built with the JL10W6 that goes in the same location (there's another thread out here on that one). I'll put them under the For Sale area if/when I decide to get rid of them...
 
very cool and very stealthy looking.... if someone looked in the window of your AV they would never guess that is a sub box....

so when will you be making these avalible to members >:D (j/k)

Grey
 
KICK A$$! (y) Your box rocks! I like the matching viny, it really make your box look finished and like attention to detail was taken!

So will you be making more and selling them? or just one time long freakn mod for your AV?

By the looks of it, looks like hours getting it just right!


Great Mod!
 
xstrmrcr said:
KICK A$$! (y) Your box rocks! I like the matching viny, it really make your box look finished and like attention to detail was taken!

So will you be making more and selling them? or just one time long freakn mod for your AV?

By the looks of it, looks like hours getting it just right!


Great Mod!

Thanks all. And yes it was just one very long "one-of-a-kind" mod for me...
 
I've been wondering about the status of your project......I'm glad to see it turned out with incredible results! (y) That is certainly a unique enclosure that takes into account practically every possible issue, from air flow to seats reclining; you did an awesome job, again!

So, just out of curiosity, what was your method of attack for vinyling that oddly shaped enclosure with such a flawless looking result?

And about the SEM product.......I know you mentioned that you didn't find it tough enough for the job, but how did you like the textured finish it created?

 
DS said:
I've been wondering about the status of your project......I'm glad to see it turned out with incredible results! (y) That is certainly a unique enclosure that takes into account practically every possible issue, from air flow to seats reclining; you did an awesome job, again!
Thanks! ;D

DS said:
So, just out of curiosity, what was your method of attack for vinyling that oddly shaped enclosure with such a flawless looking result?
The vinyl was a tough one :E:. Started with my sister-in-laws sewing machine but found that was not going happen in my lifetime (even a professional upholstery guy I know said it would take him forever to do and, knowing my perfectionist attitude, he said I still wouldn't be happy). Didn't want to mess with the heat formable stuff, so I took a black sharpie marker and outlined the outside of box where the seams would need to be. Then took some lightweight banner paper and traced the patterns and transferred to the vinyl and cut the pieces. Used 3M Super 77 adhesive on both surfaces and put them in place. That left very small gaps in places (1/16" or less) that I debated for a while on how to finish it off. Tried pinstriping, looked okay but not stealthy enough for me. So, I finally figured out through trial and error that a little acetone on the vinyl's canvas backing will allow you to separate the canvas from the vinyl, leaving only the thin vinyl layer. This allowed me to cut near flush fitting 3/16" strips to cover the seams. Goat Tuff glue was used to put the seam strips on because it grips like you wouldn't believe and almost 'welds' the vinyl together. I have some more pics of the work in progress on my home PC, I'll try to post them tonight.

DS said:
And about the SEM product.......I know you mentioned that you didn't find it tough enough for the job, but how did you like the textured finish it created?
SEM texture turned out nice. You have to experiment with the distance from the surface to produce the right texture, but it turned out nice looking. Not an exact match but I think with more practice (and another can) I could have gotten it really close. But I let it cure for 48 hours in the house and it didn't pass my moderate pressure finger nail scratch test (instructions said it required no priming but I did anyway then scuffed the surface with sandpaper as recommended just to try and get the best adhesion). Don't get me wrong, it's pretty tough, but this enclosure will see a lot of foot traffic from back seat passengers. I'm sure it would work great for areas with moderate passenger contact.
 
Pictures of the work in progress as promised. Here's one of the vinyl covering midway through the process...
 

Attachments

  • sgiacomo_covering_in_progress.JPG
    sgiacomo_covering_in_progress.JPG
    58.1 KB · Views: 38
I guess I'm going to sell my other MDF removeable box with the JL 10W6V2 if I can get a decent price for it, otherwise I'll just keep it and find a use for it at some time or another. The Kicker K65.2 components are also going out on the For Sale thread since I bought the Diamond components, although I really can't tell a lot of difference between the two and the Diamonds were 2X as expensive! Still have a US Acoustics 2100USX that I had before I bought the JL 300/2, it's been sitting in my garage for 6 months (in the box). Great amps IMHO, maybe the JL amps are better but I couldn't tell much difference there either.
 
Back
Top