• If you currently own, previously owned or want to own an Avalanche, we welcome you to become a member today. Membership is FREE, register now!

Self Install Luggage Rack=Major Frustration

RedAV

Full Member
Joined
May 11, 2002
Messages
190
OK, as a DIY, I am as handy as the next guy but this accessory is a major frustration.

Save some bucks and not have the dealership put it on I say. (The AV didn't come with it.)

I order and it comes in. Looks easy and I have installed them on other vehicles before.

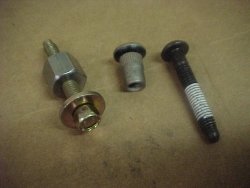
This one gets ***** (5 Stars) for frustration. Those *&^%! well nuts are a pain. The idea is you drill the holes with the supplied 9mm bit, put a well nut in, put a special tool on it and torque it until it hits 65ft/lbs. The nut expands inside of the roof and grabs it with the sides.

AKK PFFT!! Drill all the holes on one side. (First mistake.) Drill only 1-2 at a time so if you hose up you only have to get a few repaired. What if it rains? Sky clouds up.

I spend about 4 hours on one side. #3 from the front will NOT engage and will not come off. AHHEEE Panic sets in. :C:It gets dark. #3 finally works. Since the bolts are out that means rain will go through if it rains. Tape holes shut.

Start next morning. &^% #3 on that side causes trouble. :C:Get the trick. You have to push hard to make it work but not too hard to dimple the roof.

I think they wanted to charge 1-2 hours shop time. It would have been worth it but they wanted retail for the rack.

Tools: **-*** (2-3) Hand tools work but 18v drill driver works better. If you are drilling one hole and putting the nut in directly 2 drill drivers make it easier. ;D
Anxiety: ***** (5) Drilling though a roof will increase the PF!
Skill: **-***** (2 and 5) Everything else is a 2. The template makes it easy. Installing the well nuts is a 5.

Tip: If you want to keep the metal shaving from drilling from the door rubber, tape it up with blue low tack painter's masking tape. Don't forget to also tape the crack at the window and sail. Makes cleanup easier.

Tip: Use automotive grade silicone sealant AROUND the wellnuts and the roof to help the worry about leaks. There is a small amount of anti-corrosive/leak stopper on the underside of the well nut but it is easily damaged during installation. The bolts have sealant on them. Do not seal around the plastic bottom "caps" at the attachment points. There are drains there to get rid of water and you will clog them up.
 

wrchism

Charter Member
SM 2004
SM 2003
Full Member
Joined
Feb 21, 2002
Messages
1,339
Location
Greeley, CO
Thanks for recapping your adventure! Given the DIY choice and the option of rust and leaks courtesy of a dealer install, I was glad that mine came from the factory installed. I'm not sure how that came to be, but I watched them drive my Av off the transporter - roof rack in place. No rust, no drips, no errors.

But then, I don't have the adventure to recap that you do! Sounds like you succeeded in your efforts. Enjoy your roof rack!
 

Rolando

Charter Member
SM 2009
SM 2003
Full Member
Joined
Feb 28, 2002
Messages
7,018
Location
Sacramento, CA.
You're pretty bold to do it yourself. I don't touch anything electrical (except for the lights), nor do I drill.
 

RedAV

Full Member
Joined
May 11, 2002
Messages
190
wrchism,

The rack and attachment is the same DIY, Dealership or factory. The risks are the same if you do a good install. I would worry more about the dealer. Is this one of those things they would give to one of those high school guys doing new vehicle prep?

Read some of the stories here about misaligned racks. At least I know I did it right although with the other two ways you always have warranty. (Well maybe me too if they don't ask too hard. >:D)

Roaringrow,

The worst part is drilling the holes. That really increases the pucker factor. Knowing it is you that will go back to the dealership to get repairs or bailed out (and have them snicker behind your back) is something to think about.

WHIRRR, drilled the hole, to late to back out. ;D
 

byron

SM 2003
Full Member
Joined
Apr 30, 2002
Messages
1,014
Location
Conroe, TX
I'm thinking hard about installing a roof rack. But guys....I gotta tell you....I don' t think I have a pair big enough for me to walk up to my beloved AV and drill a hole in the roof myself.

In my case I'll definitely let it be a dealer item.
 

Chief

CAFCNA FOUNDER
Charter Member
SM 2008
SM 2007
SM 2006
SM 2005
SM 2004
SM 2003
Full Member
Joined
Jan 10, 2002
Messages
12,693
Location
Edmonds, WA
Darn! That story with pics would have been a great CAFCNA Magazine piece...
 

RedAV

Full Member
Joined
May 11, 2002
Messages
190
Chief said:
Darn! ?That story with pics would have been a great CAFCNA Magazine piece...

Where you talking about my original posting?

PFFT! That's nothang.

What if I take the rack off show where the attachment points are, show the tool and the special drill bit, retape, then put the rack on?

Also enhance this stoy a little. I also kept the directions. I wonder if they could be scanned in and put in a .pdf file to allow people a choice to read them first before deciding to tackle this as a DIY.

 
L

Legend

GUEST
The roof rack is kind of flimsy in my opinion. I am thinking of coming up with something that could mount on the panels possibly. Any ideas?

Legend
 

ygmn

This is a Custom Title
Staff member
Administrator
Moderator
Charter Member
PM 2023
PM 2022
PM 2021
PM 2020
PM 2019
PM 2018
PM 2017
PM 2016
PM 2015
PM 2014
PM 2013
PM 2012
SM 2011
SM 2010
SM 2009
SM 2008
SM 2007
SM 2006
SM 2005
SM 2004
SM 2003
Full Member
Joined
Jan 17, 2002
Messages
35,634
Location
Bourbon St. Balcony
Was the rack worth the trouble?

I still have mine in the box and well the PF is still there.
 

marc_w

Full Member
Joined
Jun 5, 2002
Messages
1,112
Location
Douglas, MA
Are you guys just grabbing yours from the dealers? How much are they running? (the same $199 as the dealer installed option?)

I'm looking toss one on one of these days.
 

ygmn

This is a Custom Title
Staff member
Administrator
Moderator
Charter Member
PM 2023
PM 2022
PM 2021
PM 2020
PM 2019
PM 2018
PM 2017
PM 2016
PM 2015
PM 2014
PM 2013
PM 2012
SM 2011
SM 2010
SM 2009
SM 2008
SM 2007
SM 2006
SM 2005
SM 2004
SM 2003
Full Member
Joined
Jan 17, 2002
Messages
35,634
Location
Bourbon St. Balcony
When I bought my AVY they did not install it yet and it was in the bed in a box....I told them I would come back for the install.......well it has been 9 months now and it is still in the box.
 

ygmn

This is a Custom Title
Staff member
Administrator
Moderator
Charter Member
PM 2023
PM 2022
PM 2021
PM 2020
PM 2019
PM 2018
PM 2017
PM 2016
PM 2015
PM 2014
PM 2013
PM 2012
SM 2011
SM 2010
SM 2009
SM 2008
SM 2007
SM 2006
SM 2005
SM 2004
SM 2003
Full Member
Joined
Jan 17, 2002
Messages
35,634
Location
Bourbon St. Balcony
Ok after opening the box (had since September with the new truck) and checking the contents and reading the directions and playing with the tool and well nut......

I have decided to install my luggage rack in lieu of the dealer doing it.....

I will take pics of the whole process .... ?Well I promise too....If I screw up no one will see the pics >:D

I expect to start tomorrow and finish Saturday as I will take my time.

Ps my box did not have the 9mm drill bit but said I need one......I might get a bit smaller to see as the problem would be if I wobble a hole and then the well nut does not grab the sheet metal......

Oooooooooooo drilling th holes will be rough....I need to buy some DEPENDS for insurance against blowing a Glutious maximus gasket and having a leaky midgate if you get my meaning.... ?;D :( ??? :p :-[ :-X :cry: :3: :6: :7: :C: :C:
 

RedAV

Full Member
Joined
May 11, 2002
Messages
190
ygmn said:
Ps my box did not have the 9mm drill bit but said I need one......I might get a bit smaller to see as the problem would be if I wobble a hole and then the well nut does not grab the sheet metal......

Oooooooooooo drilling th holes will be rough....I need to buy some DEPENDS for insurance against blowing a Glutious maximus gasket and having a leaky midgate if you get my meaning.... ?;D :( ??? :p :-[ :-X :cry: :3: ?:6: :7: :C: :C:

I was the original poster.

Sorry, I must have missed some of the follow on questions.

It was worth it. I don't think it affected the look that much. I also have a zippered watherproof case I had earlier for it.

I would NOT suggest getting a smaller/larger drill bit. The hole size has to be <b>exactly</b> 9mm for the wellnuts to work. If it is oversized or not rounded exactly the sides will not grip and you will be hosed.

Try to find one, or, if you really can't find one I will send mine to you. (Of course you will have to wait for it to make it to you.)

Drilling the holes is the true test of manhood. :eek:

After that its all down hill. ;D
 

ygmn

This is a Custom Title
Staff member
Administrator
Moderator
Charter Member
PM 2023
PM 2022
PM 2021
PM 2020
PM 2019
PM 2018
PM 2017
PM 2016
PM 2015
PM 2014
PM 2013
PM 2012
SM 2011
SM 2010
SM 2009
SM 2008
SM 2007
SM 2006
SM 2005
SM 2004
SM 2003
Full Member
Joined
Jan 17, 2002
Messages
35,634
Location
Bourbon St. Balcony
Here is a pic of the insertion tool, wellnut & bolt in left to right order for those wondering...
 

Attachments

  • MVC-440F.JPG
    MVC-440F.JPG
    45.1 KB · Views: 459

ygmn

This is a Custom Title
Staff member
Administrator
Moderator
Charter Member
PM 2023
PM 2022
PM 2021
PM 2020
PM 2019
PM 2018
PM 2017
PM 2016
PM 2015
PM 2014
PM 2013
PM 2012
SM 2011
SM 2010
SM 2009
SM 2008
SM 2007
SM 2006
SM 2005
SM 2004
SM 2003
Full Member
Joined
Jan 17, 2002
Messages
35,634
Location
Bourbon St. Balcony
and the instruction for the wellnuts...
 

Attachments

  • MVC-448F.JPG
    MVC-448F.JPG
    48 KB · Views: 464

ygmn

This is a Custom Title
Staff member
Administrator
Moderator
Charter Member
PM 2023
PM 2022
PM 2021
PM 2020
PM 2019
PM 2018
PM 2017
PM 2016
PM 2015
PM 2014
PM 2013
PM 2012
SM 2011
SM 2010
SM 2009
SM 2008
SM 2007
SM 2006
SM 2005
SM 2004
SM 2003
Full Member
Joined
Jan 17, 2002
Messages
35,634
Location
Bourbon St. Balcony
Done in a little less than 4 hours...I took my time and it decided to rain during the process...I also used a lot of tape and did a few of the well nuts first prior to drilling all the holes

I bet I could do one in 1 - 2 hours with an assistant.

I did notice that with my truck I had to drill through 2 layers of sheet metal in almost all the locations...I never broke through the liner and the metal shavings are a PIA...I vacuumed them up and then wiped down.

It is out in the rain for the soak test now....I will post the webpage to the pics I took later this eveing when someone gets off my other computer... >:D
 

ygmn

This is a Custom Title
Staff member
Administrator
Moderator
Charter Member
PM 2023
PM 2022
PM 2021
PM 2020
PM 2019
PM 2018
PM 2017
PM 2016
PM 2015
PM 2014
PM 2013
PM 2012
SM 2011
SM 2010
SM 2009
SM 2008
SM 2007
SM 2006
SM 2005
SM 2004
SM 2003
Full Member
Joined
Jan 17, 2002
Messages
35,634
Location
Bourbon St. Balcony
A

aenlle

GUEST
I was assisted by a friend who was experienced with body work. I would say two individuals are needed one on each side of the AV. Get two ladders to see what you are doing.

The rack comes with proper drill bit size, mounts, screws and tool to install. I think a template for locating the rack was included. We wrapped the drill bit at the proper length (depth of rack plus 1/8")with tape to avoid pushing through the headliner. The rear mounts go through two layers of metal.

The first mount didn't tighten up all the way until we followed the instructions and applied small amt of oil to tool. Subsequently, we were able to firmly compress the mount onto the roof metal. The mounts have a rubber gasket under the head where it touches the roof; make sure that it is tight.

I should have taken more care in keeping the metal shavings from falling over the sides where they did get under the door gaskets on top of the door. I would recommend masking tape and a 6" roll of masking paper to keep shavings from going over the sides. A vacuum would be the best way of collecting them. Resist blowing them off.

Attaching the rubber strips on the roof ?is probably best done while ?standing in the bed or the hard bedcovers while applying them.

So far no leaks noted. I did get some rust under the rubber gaskets over the doors but after some rubbing compound and careful cleaning of the embedded filings in the rubber the problem is over. Most of the rust was from the filings and not from the body (in my case).

Just do things carefully and you shouln't have problems


Ed Aenlle
 

ygmn

This is a Custom Title
Staff member
Administrator
Moderator
Charter Member
PM 2023
PM 2022
PM 2021
PM 2020
PM 2019
PM 2018
PM 2017
PM 2016
PM 2015
PM 2014
PM 2013
PM 2012
SM 2011
SM 2010
SM 2009
SM 2008
SM 2007
SM 2006
SM 2005
SM 2004
SM 2003
Full Member
Joined
Jan 17, 2002
Messages
35,634
Location
Bourbon St. Balcony
Those owers whose kits included drill bit and template....

When did you get the kit? Did you buy it as option or included with truck and not installed?

Mine was in the bed when I bought the truck and I did not want them to install it back in Septemeber 2001.....

Mine did not have a template nor a drill bit.....I am curious if they changed the kit up due to all the original problems dealers had doing installations.
 
A

aenlle

GUEST
The rack included the proper metric sized drill bit and tool to apply the rack mounts. Drilling could be accomplished by lining up the rack on the roof and marking holes with fiber tipped pen (use masking tape where you will be drilling).

Do not use improper sized bit -close tolerance required for the threaded mounts. See previously posted pictures on this thread
 

Ted

SM 2003
Full Member
Joined
Jun 8, 2002
Messages
85
Location
Anaheim CA
I Installed mine this morning. It took about 2 hours. I used the rack as a drill template. I also used a 1/8" drill bit to make pilot holes. Tape the rack down so you don't move it while you drill the pilot holes. Take the rack off to drill the 9mm holes. :B:
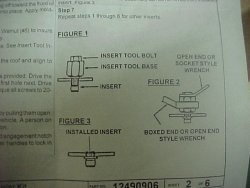
Use a long 1/2" boxed end to hold the well nut tool. I used to work in a truck body and paint shop so I am familiar with well nuts (we used to call them Riv Nuts)
 

ygmn

This is a Custom Title
Staff member
Administrator
Moderator
Charter Member
PM 2023
PM 2022
PM 2021
PM 2020
PM 2019
PM 2018
PM 2017
PM 2016
PM 2015
PM 2014
PM 2013
PM 2012
SM 2011
SM 2010
SM 2009
SM 2008
SM 2007
SM 2006
SM 2005
SM 2004
SM 2003
Full Member
Joined
Jan 17, 2002
Messages
35,634
Location
Bourbon St. Balcony
NW_Nick said:
Does anyone know where to get a 9mm drill bit? ?My rack d/n come with this tool, and I really, REALLY need it now!

:rolleyes:

Ace Hardware had one for me as well as HOME DEPOT.......

Call around you would be suprized
 
Top